创建航拍相机App
如果您在本教程中遇到任何错误或者bug,请使用Github issue,在DJI论坛发帖或者在Gitbook中评论告知我们。您可以随时给我们发送Github pull request来帮助我们修复错误。关于文档的修改需要符合格式标准
请先把demo project 下载下来。demo project可以在以下的网页上下载: https://github.com/DJI-Mobile-SDK/Android-FPVDemo.git
在大家阅读这个教程时,我们强烈建议大家打开demo project,这样大家可以一步一步的跟着这个教程去做,同时参考demo project。
概述
在本教程中,我们会教大家怎么去设置你们的编程环境,申请并激活你们的DJI应用程序,和查看你们的无人飞机的相机显示应用程序,同时, 你将学到如何在app中添加拍照和录像功能。
准备程序
(1)请先下载 The Mobile SDK:https://developer.dji.com/mobile-sdk/downloads
(2)更新你的无人机的固件: 可以依据文档http://download.dji-innovations.com/downloads/phantom_3/cn/How_to_Update_Firmware_cn.pdf里的飞行器固件升级步骤升级。
(3)请准备一个Android开发环境(如果你现在没有一个Android开发环境).请注意,在这个教程里面,我们只使用了Eclipse 4.2.2.你可以在这里下载: https://eclipse.org/downloads/packages/eclipse-classic-422/junosr2.下载完Eclipse 以后,你得下载Eclipse Android Development Tool Plug-in. 可在这下载:http://developer.android.com/intl/zh-TW/sdk/installing/installing-adt.html
注意: Google对Android Development Tools in Eclipse的支持要结束了。如果你还想继续在Eclipse里完成这个demo或已在Eclipse里完成了这个demo,你可以在这个链接上找到如何把你已完成或正在做的project从Eclipse上移到Android Studio上面去: http://dji-dev.gitbooks.io/mobile-sdk-tutorials/content/zh-cn/Android/AndroidStudioMigration/Android_Studio_Migration_Tutorial_ch.html。如果你想在Android Studio上面完成这个教程,Mobile SDK文件夹里面存有一个Android Studio软件包和一个Eclipse软件包,你可以参考Android Studio的SDK DEMO工程或Get Start工程。不过,我们建议你用Eclipse完成这个教程,然后再把你的project转换到Android Studio上面去。
配置编程环境
Eclipse
(1)新建一个Android Application Project.如果你想的话,你可以为the Application, Project, and Package起名字。在项目设置下的'Create Activity'页面上,创新一个的活动并把名字改成'FPVActivity'。布局活动应该自动填写到'activity_fpv'
(2)将软件包解压缩。导入一个叫Lib文件夹(Eclipse\DJI-SDK-Android-V2.1.0)到Eclipse里面(File -> Import -> Android -> Existing Android Code into Workspace)。下一步,把导入的文件加到你的library (right click on your project -> Select "Properties" -> Select "Android" -> Add).
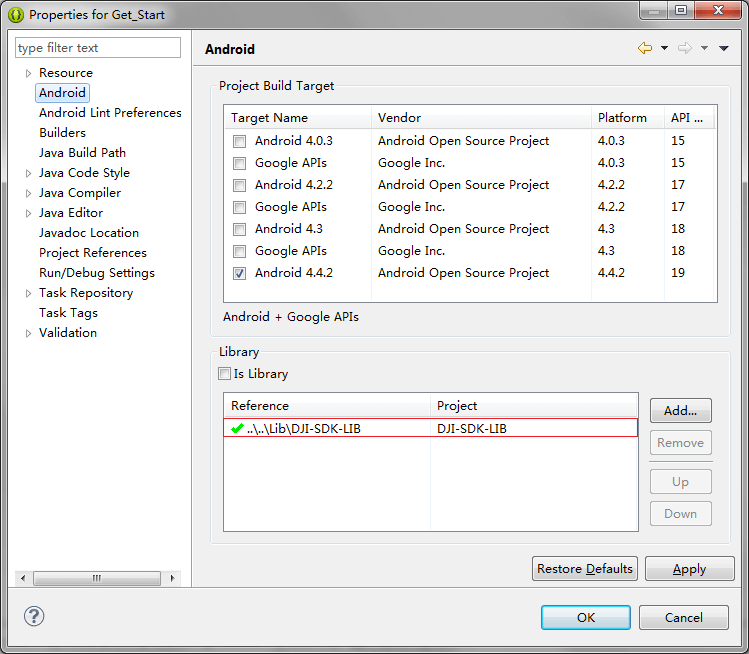
(3)已被导入的library应该被存在这里:
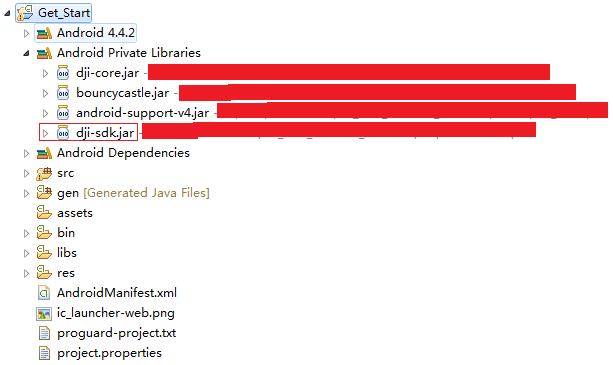
Android Studio
(1) 创新一个新的Android Studio Project.可给这个apllication一个新名字。点击'next'直到你点到'Customize the Activity'页面。你应该把你的activity的名字变成'FPVActivity'。布局的名字会自动的变成'activity_fpv'。点击'Finish'。
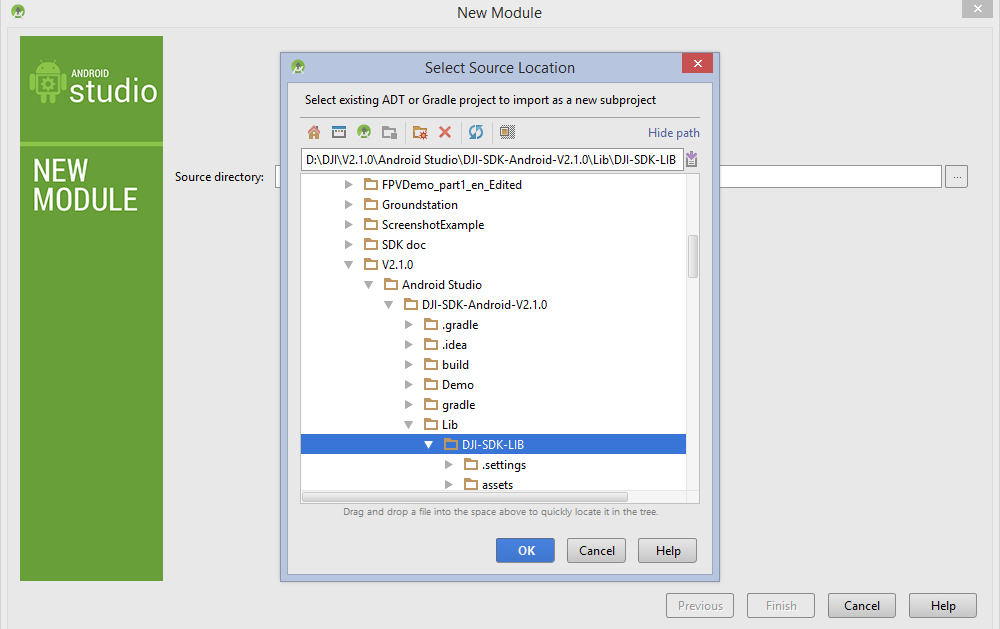
(2)将下载的SDK软件包按如此步骤Go to File -> New -> Import Module导入Android Studio。在'Source Directory'里,找一个文件叫DJI-SDK-LIB(Android Studio\DJI-SDK-Android-V2.1.0\Lib\DJI-SDK-LIB)。点击Finish.
注意: Android Studio文件夹能从DJI网站下载下来的SDK Package里找到。demo project里面用的软件包是用的'Eclpise'文件夹里的。如果你要用Android Studio,确保你用的是Android Studio文件夹里面的软件包。SDK Package 能在此下载:https://developer.dji.com/mobile-sdk/downloads*
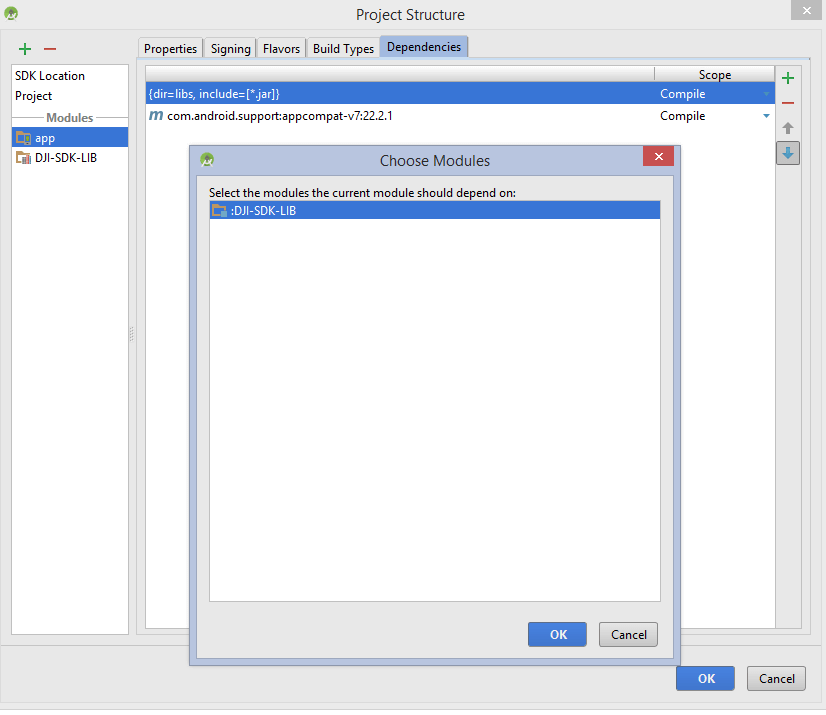
然后,在"Packages"视图下,右击左边项目列表中的'app'模块。出现下拉框,点击'Open Module Settings'。找到一个叫'Dependencies'的标签。点击那个绿色加号,然后点击‘Module Dependency'并选择':DJI-SDK-LIB'。点击'OK'来确认。Gradle完成重建后,你的编程环境设置完毕。
显示FPV视图
(1) 激活SDK:
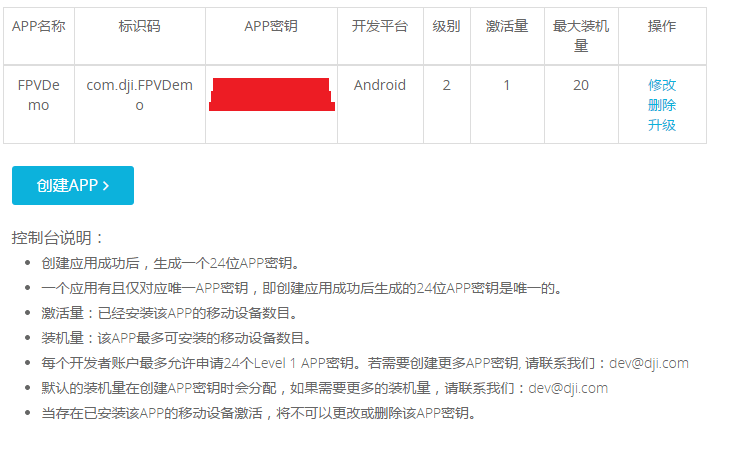
请使用你在DJI开发者网站上申请的APP KEY填入android:value=""。当申请APP KEY的时候,需要在标识码处填入你的工程的包名。
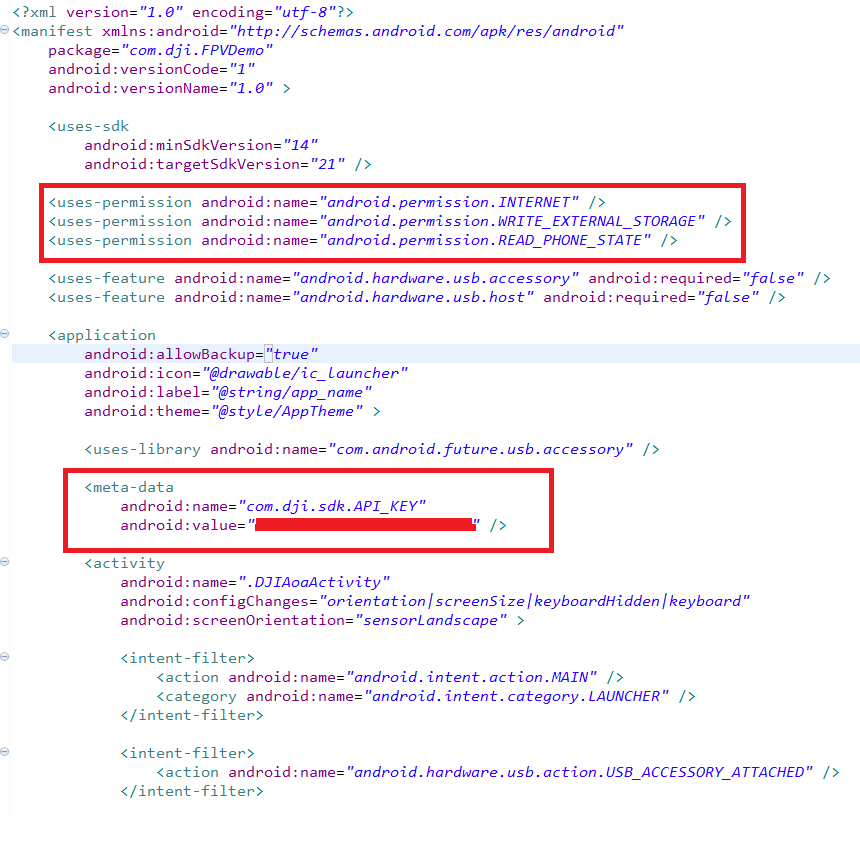
在工程的AndroidManifest.xml文件中添加以下meta-data元素配置用来激活的APP KEY和'uses-permission'代码行。
在开始调用SDK APIs之前,需要添加以下代码来进行激活验证,
    new Thread(){
        public void run(){
            try{
                DJIDrone.checkPermission(getApplicationContext(), new DJIGeneralListener(){
                    @Override
                    public void onGetPermissionResult(int result){
                        if(result == 0) {
                            // show success
                            Log.e(TAG, "onGetPermissionResult ="+result);
                            Log.e(TAG, "onGetPermissionResultDescription="+DJIError.getCheckPermissionErrorDescription(result));
                        }else {
                            // show error
                            Log.e(TAG, "onGetPermissionResult ="+result);
                            Log.e(TAG, "onGetPermissionResultDescription="+DJIError.getCheckPermissionErrorDescription(result));
                        }
                    }
                });
            } catch (Exception e) {
                e.printStackTrace();
            }
        }
    }.start();
只有在激活成功之后,SDK APIs才能被调用成功。激活结果的返回码和相应的描述请见下表,
| 返回错误码 | 错误描述 |
|---|---|
| 0 | 验证成功 |
| -1 | 没有网络连接 |
| -2 | 无效的app key |
| -3 | 获取授权数据超时 |
| -4 | 设备uuid不匹配 |
| -5 | 工程包名和申请app key时的标识码不匹配 |
| -6 | App key被禁 |
| -7 | 激活量已经到达最大装机量 |
| -8 | App key的使用平台不正确 |
| -9 | App key不存在 |
| -10 | App key没有权限 |
| -11 | 服务器解析失败 |
| -12 | 服务器获取设备uuid错误 |
| -13 | 服务器app包名不对 |
| -14 | 服务器解析激活数据失败 |
| -15 | AES 256加密不支持 |
| -16 | AES 256加密失败 |
| -17 | 获取设备uuid失败 |
| -18 | 空的App keyEmpty app key |
| -1000 | 服务器错误 |
如果你收到一个错误代码不是'0',请按照下面的说明:
1.确保您可以访问互联网
- 确保在DJI开发者网站创建应用程序时,你必须用你的project package的名字去填写那个'Identification Code'。
- 确保应用程序激活码没有达到其安装的容量限制。如果这还不能解决你的问题,参考以上的故障排除表。如果你有更多的问题,请通过发送Email到我们的Mobile SDK部门:[email protected]
(2) 添加对Android Open Accessory (AOA)的支持:
DJI的遥控器最新的固件将需要app端实现对AOA的支持。在Demo程序中,我们提供了对AOA支持的一个样例。在AndroidManifest.xml文件中,使用DJIAoaActivity作为主activity,即是打开app时第一个执行的activity。并添加intent-filter和meta-data。以及在AndroidManifest.xml中添加 uses-feature android:name="android.hardware.usb.accessory" android:required="false", uses-feature android:name="android.hardware.usb.host" android:required="false", 和在application标签下添加 uses-library android:name="com.android.future.usb.accessory"。
    ...

    <uses-feature android:name="android.hardware.usb.accessory" android:required="false" />
    <uses-feature android:name="android.hardware.usb.host" android:required="false" />
    <application
        android:label="@string/app_name"
        android:theme="@style/AppTheme">

        <uses-library android:name="com.android.future.usb.accessory" />
    ...
        <activity
            android:name=".DJIAoaActivity"
            android:configChanges="orientation|screenSize|keyboardHidden|keyboard"
            android:screenOrientation="sensorLandscape" >

            <intent-filter>
                <action android:name="android.intent.action.MAIN" />
                <category android:name="android.intent.category.LAUNCHER" />
            </intent-filter>

            <intent-filter>
                <action android:name="android.hardware.usb.action.USB_ACCESSORY_ATTACHED" />
            </intent-filter>

            <meta-data
                android:name = "android.hardware.usb.action.USB_ACCESSORY_ATTACHED"
                android:resource = "@xml/accessory_filter" />
        </activity>
DJIAoaActivity中有添加如下代码支持AOA,
    private static boolean isStarted = false;
    ...
    @Override
    protected void onCreate(Bundle savedInstanceState){
        super.onCreate(savedInstanceState);
        setContentView(new View(this));

        if (isStarted) {
            //Do nothing
        }else {
            isStarted = true;
            ServiceManager.getInstance();
            UsbAccessoryService.registerAoaReceiver(this);
            Intent intent = new Intent(DJIAoaActivity.this, FPVActivity.class);
            startActivity(intent);
        }

        Intent aoaIntent = getIntent();
        if(aoaIntent != null) {
            String action = aoaIntent.getAction();
            if (action==UsbManager.ACTION_USB_ACCESSORY_ATTACHED || action == Intent.ACTION_MAIN){
                Intent attachedIntent = new Intent();
                attachedIntent.setAction(DJIUsbAccessoryReceiver.ACTION_USB_ACCESSORY_ATTACHED);
                sendBroadcast(attachedIntent);
            }
        }
        finish();
    }
    ...
以上代码让程序在打开时运行Service支持AOA连接遥控器,然后我们还需要在每一个Activity运行onPause()或是onResume()回调接口时,相应的暂停或是继续该Service。你可以通过让Activity继承Demo程序中的DemoBaseActivity来实现。DemoBaseActivity中的代码片段如下,
    ...
    @Override
    protected void onResume(){
        super.onResume();
        ServiceManager.getInstance().pauseService(false); // Resume the service
    }

    @Override
    protected void onPause() {
        super.onPause();
        ServiceManager.getInstance().pauseService(true); // Pause the service
    }
(3) 在APP上实现FPV实时视频显示
(1) 在使用SDK APIs之前,我们先需要根据连接的飞机的类型来初始化SDK APIs.使用DJIDrone类里的public static boolean initWithType(Context mContext, DJIDroneType type)方法来初始化。
    @Override
    protected void onCreate(Bundle savedInstanceState){

        ...
        DroneCode = 1;
        onInitSDK(DroneCode);
        ...
    }

    private void onInitSDK(int type){
        switch(type){
            case 0: {
                DJIDrone.initWithType(this.getApplicationContext(), DJIDroneType.DJIDrone_Vision);
                // The SDK initiation for Phantom 2 Vision or Vision Plus
                break;
            }
            case 1: {
                DJIDrone.initWithType(this.getApplicationContext(), DJIDroneType.DJIDrone_Inspire1);
                // The SDK initiation for Inspire 1 or Phantom 3 Professional.
                break;
            }
            case 2: {
                DJIDrone.initWithType(this.getApplicationContext(), DJIDroneType.DJIDrone_Phantom3_Advanced);
                // The SDK initiation for Phantom 3 Advanced
                break;
            }
            case 3: {
                DJIDrone.initWithType(this.getApplicationContext(), DJIDroneType.DJIDrone_M100);
                // The SDK initiation for Matrice 100.
                break;
            }
            default:{
                break;
            }
    }

    ...
(2) 在初始化SDK APIs之后,我需要使用DJIDrone类里面的public static boolean connectToDrone()方法连接飞机,
DJIDrone.connectToDrone(); // Connect to the drone
(3) 现在我们可以实例化一个视频数据的回调接口DJIReceivedVideoDataCallBack(), 然后调用API public public void setReceivedVideoDataCallBack(DJIReceivedVideoDataCallBack mReceivedVideoDataCallBack)来获取实时视频数据(raw H264格式)。用户可以实现自己的代码去处理该视频数据。这里,我们使用DJI SDK提供的解码器来解码该视频数据,并把解码出来的视频显示在SurfaceView。
在 layout activity_fpv.xml里面添加surfaceview, 该layout是FPVActivity的界面文件,
    <dji.sdk.widget.DjiGLSurfaceView
        android:id="@+id/DjiSurfaceView_02"
        android:layout_width="fill_parent"
        android:layout_height="fill_parent" />
添加代码把视频数据发送到类DjiGLSurfaceView实例化的一个对象,该对象对其进行解码并进行显示。
    ...

    private DjiGLSurfaceView mDjiGLSurfaceView;

    ...

    @Override
    protected void onCreate(Bundle savedInstanceState) {
        super.onCreate(savedInstanceState);
        setContentView(R.layout.activity_fpv);

        ...

        mDjiGLSurfaceView = (DjiGLSurfaceView)findViewById(R.id.DjiSurfaceView_02);
        mDjiGLSurfaceView.start();
        mReceivedVideoDataCallBack = new DJIReceivedVideoDataCallBack(){
            @Override
            public void onResult(byte[] videoBuffer, int size){
                mDjiGLSurfaceView.setDataToDecoder(videoBuffer, size);
            }
        };
        DJIDrone.getDjiCamera().setReceivedVideoDataCallBack(mReceivedVideoDataCallBack);

        ...


    }
注意:需要先调用实例化对象mDjiGLSurfaceView的public boolean start()方法,然后调用DJIDrone.getDjiCamera().setReceivedVideoDataCallBack(mReceivedVideoDataCallBack)把视频数据传递给mDjiGLSurfaceView解码并显示视频。
当显示视频的activity关闭时,你需要先调用DJIDrone.getDjiCamera().setReceivedVideoDataCallBack(null)停止传递视频数据给mDjiGLSurfaceView, 然后再释放mDjiSurfaceView。相关代码如下,
    ...

    @Override
    protected void onDestroy() {
        if (DJIDrone.getDjiCamera() != null) {
            DJIDrone.getDjiCamera().setReceivedVideoDataCallBack(null);
        }
        mDjiGLSurfaceView.destroy();

        ...
    }
你应该注意调用mDjiGLSurfaceView的方法public boolean start()和设置视频数据回调接口给mDjiGLSurfaceView传递视频数据的顺序,以及释放mDjiGLSurfaceView和停止传递数据给它的顺序。
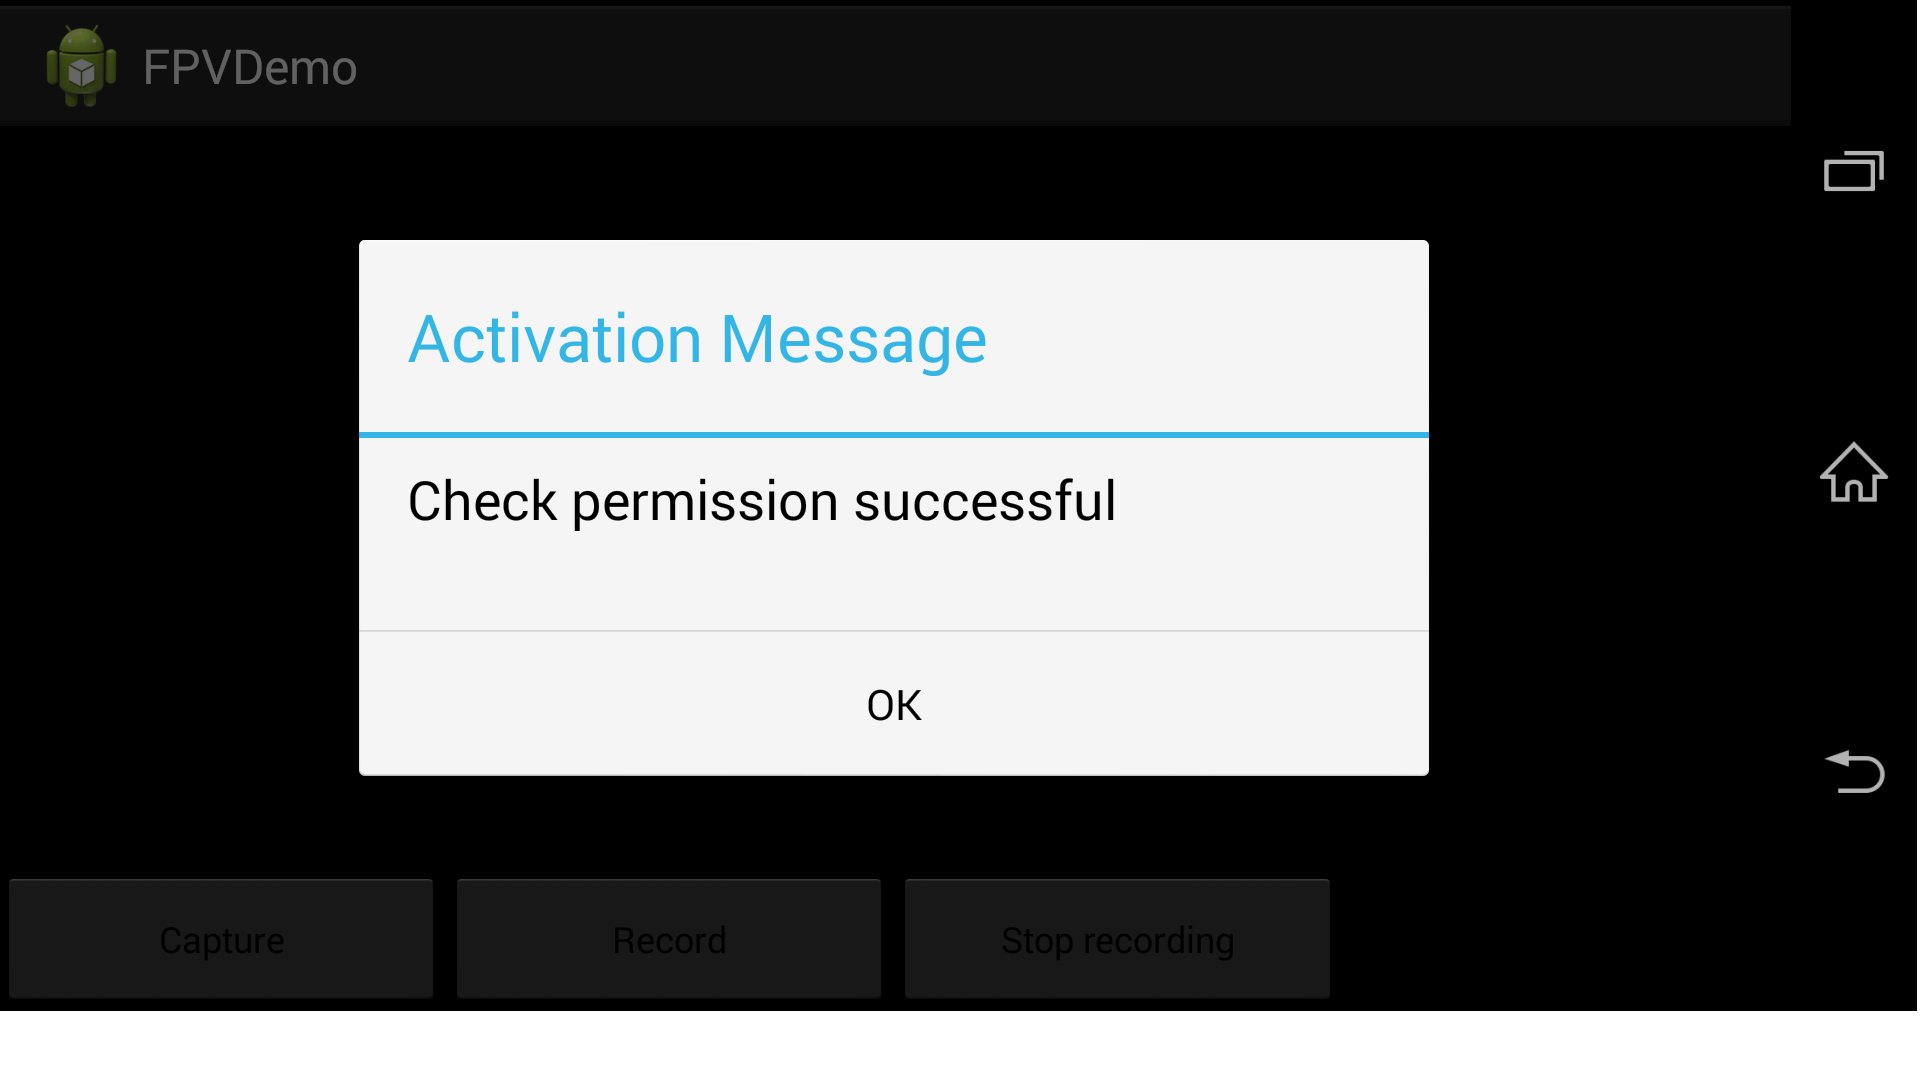
(4) 编译并运行你的工程,检查一切是否正常。如果在运行后看到移动端出现如下界面,你就可以开始用你自己的APP连接飞机,并享受飞机实时传回航拍视频的乐趣了!
连接飞行器
完成以上步骤后, 现在就可以连接你的移动设备到DJI飞行器上,检查是否获取到FPV画面,以下是连接指引:
连接 Inspire 1, Phantom 3 Professional 或者 Phantom 3 Advanced:
首先启动遥控器电源, 再启动你的飞行器
使用USB数据线将移动设备连接到遥控器上,当弹出为USB设备选择一个应用时,选择你自己开发的应用
当弹出“是否允许应用连接USB设备”时,选择允许。
点击“OK”当激活成功。
飞行器相机的实时视频就会显示在你的移动设备上。
连接 DJI Phantom 2 Vision+ or Phantom 2 Vision:
首先启动遥控器电源, 再启动你的飞行器
确认移动设备有互联网连接,打开应用激活DJI SDK。当激活成功点击“OK”。
启动Wi-Fi中继器电源
在你的移动设备上启动 WIFI ,然后连接到名字类似Phantom-xxxxxx (xxxxxx是你的中继器SSID数字)的WIFI网络上
飞行器相机的实时视频就会显示在你的移动设备上
享受FPV视图
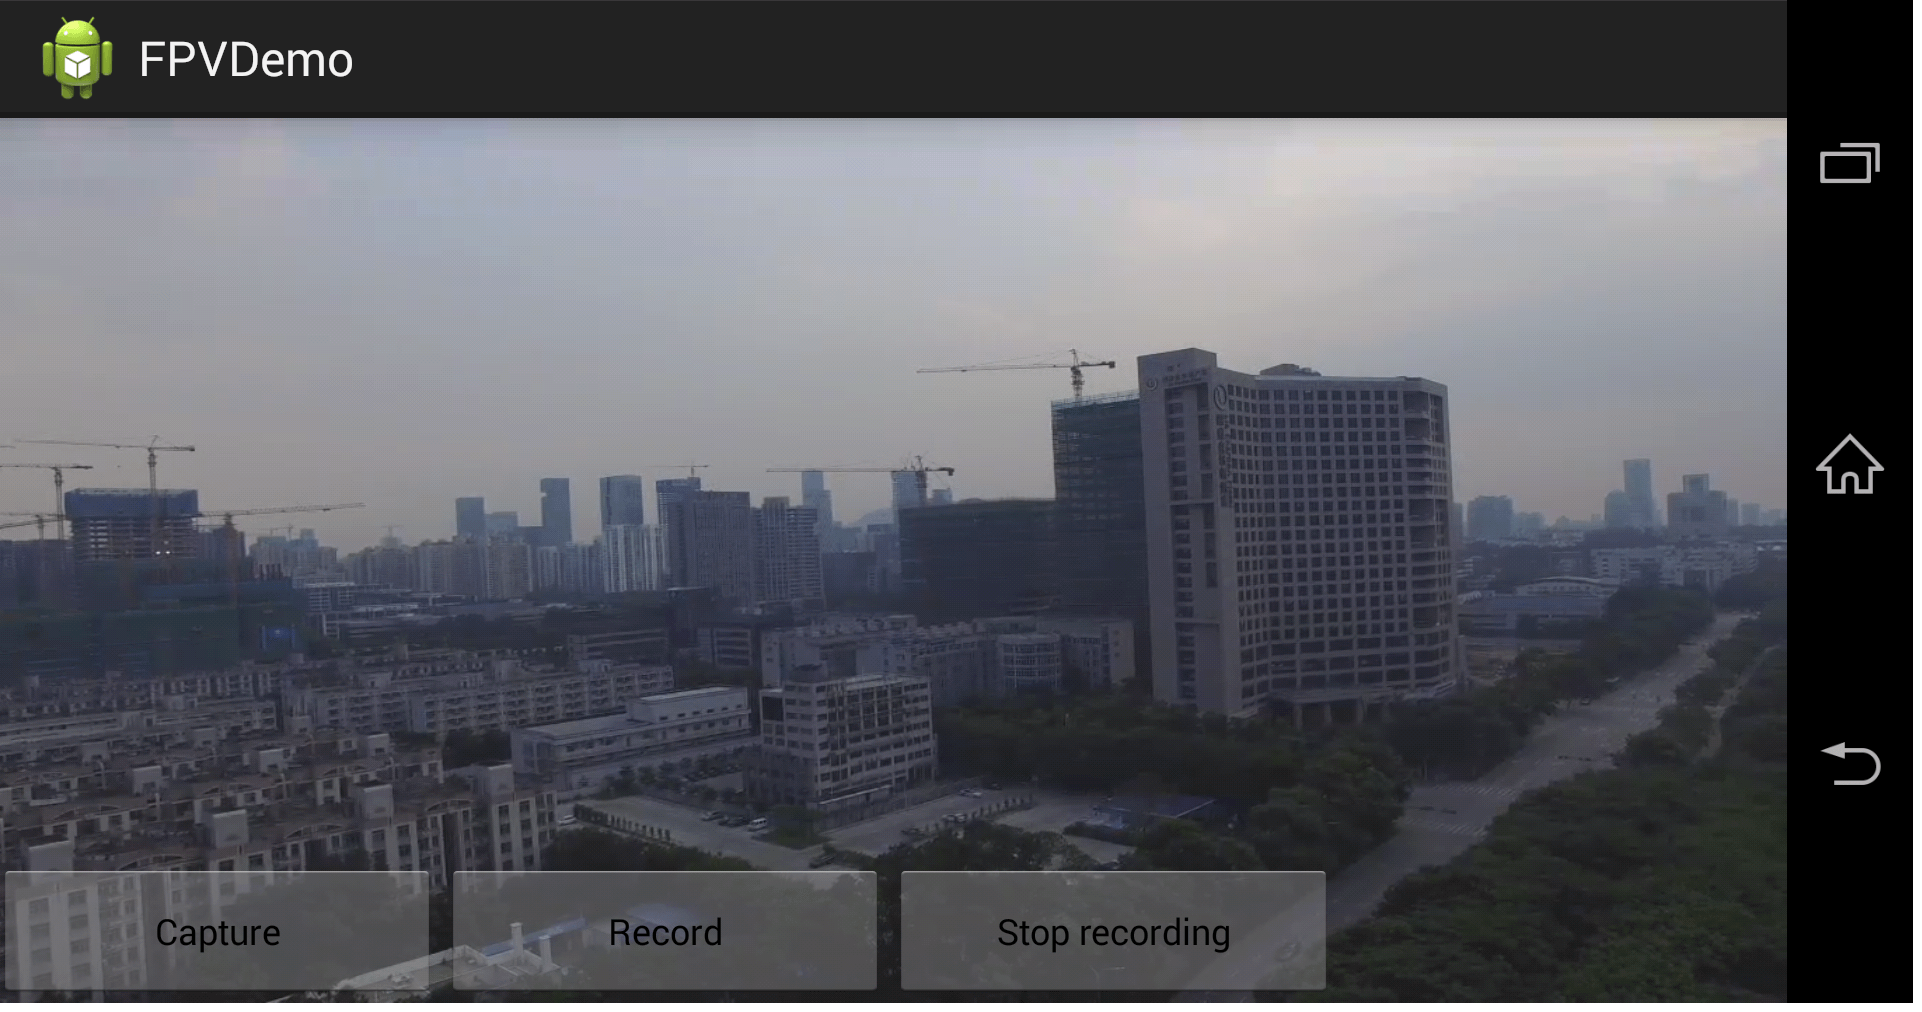
如果你可以在app中看到飞机的视频流,那么恭喜,你已经完成了第一部分教程的内容了!下图是app的截屏:
实现拍照功能
我们在FPVActivity中实现了方法private void captureAction()来进行拍照。当按下按钮“Capture”, 该方法将被调用,将拍下一张照片存储在飞机上的SD卡上。private void captureAction()方法的代码如下,
     // function for taking photo
    private void captureAction(){

        CameraMode cameraMode = CameraMode.Camera_Capture_Mode;
        // Set the cameraMode as Camera_Capture_Mode. All the available modes can be seen in
        // DJICameraSettingsTypeDef.java
        DJIDrone.getDjiCamera().setCameraMode(cameraMode, new DJIExecuteResultCallback(){

            @Override
            public void onResult(DJIError mErr)
            {

                String result = "errorCode =" + mErr.errorCode + "\n"+"errorDescription =" + DJIError.getErrorDescriptionByErrcode(mErr.errorCode);
                if (mErr.errorCode == DJIError.RESULT_OK) {
                    CameraCaptureMode photoMode = CameraCaptureMode.Camera_Single_Capture;
                    // Set the camera capture mode as Camera_Single_Capture. All the available modes
                    // can be seen in DJICameraSettingsTypeDef.java

                    DJIDrone.getDjiCamera().startTakePhoto(photoMode, new DJIExecuteResultCallback(){

                        @Override
                        public void onResult(DJIError mErr)
                        {

                            String result = "errorCode =" + mErr.errorCode + "\n"+"errorDescription =" + DJIError.getErrorDescriptionByErrcode(mErr.errorCode);
                            handler.sendMessage(handler.obtainMessage(SHOWTOAST, result));  // display the returned message in the callback
                        }

                    }); // Execute the startTakePhoto API if successfully setting the camera mode as
                        // Camera_Capture_Mode
                } else {
                    handler.sendMessage(handler.obtainMessage(SHOWTOAST, result));
                    // Show the error when setting fails
                }

            }

        });

    }
在方法private void captureAction()中有两步,第一步是设置相机模式;第二步是设置相机拍照模式并拍照。我们把第二步的相关代码放在第一步的回调接口的onResult()方法里面,这样可以保证成功运行完第一步后再执行第二步。
编译并运行工程,连接飞行器试一下拍照功能,当在按下"capture"按钮后,屏幕闪了一下就说明拍照功能可以使用了。
实现录像功能
与实现拍照功能类似,我们实现了方法private void recordAction()来进行录像功能。当按下“Record”按钮,该方法将被调用,飞机上的相机开始录像。代码如下,
     // function for starting recording
    private void recordAction(){
        // Set the cameraMode as Camera_Record_Mode.
        CameraMode cameraMode = CameraMode.Camera_Record_Mode;
        DJIDrone.getDjiCamera().setCameraMode(cameraMode, new DJIExecuteResultCallback(){

            @Override
            public void onResult(DJIError mErr)
            {

                String result = "errorCode =" + mErr.errorCode + "\n"+"errorDescription =" + DJIError.getErrorDescriptionByErrcode(mErr.errorCode);
                if (mErr.errorCode == DJIError.RESULT_OK) {

                    //Call the startRecord API
                    DJIDrone.getDjiCamera().startRecord(new DJIExecuteResultCallback(){

                        @Override
                        public void onResult(DJIError mErr)
                        {

                            String result = "errorCode =" + mErr.errorCode + "\n"+"errorDescription =" + DJIError.getErrorDescriptionByErrcode(mErr.errorCode);
                            handler.sendMessage(handler.obtainMessage(SHOWTOAST, result));  // display the returned message in the callback

                        }

                    }); // Execute the startTakePhoto API
                } else {
                    handler.sendMessage(handler.obtainMessage(SHOWTOAST, result));
                }

            }

        });

    }
实现停止录像功能
在FPVActivity中,方法private void stopRecord() 被实现用来停止录像。当按下按钮“Stop recording”,该方法将被调用,飞机上的相机将停止录像。代码如下,
     // function for stopping recording
    private void stopRecord(){
    // Call the API
        DJIDrone.getDjiCamera().stopRecord(new DJIExecuteResultCallback(){

            @Override
            public void onResult(DJIError mErr)
            {

                String result = "errorCode =" + mErr.errorCode + "\n"+"errorDescription =" + DJIError.getErrorDescriptionByErrcode(mErr.errorCode);
                handler.sendMessage(handler.obtainMessage(SHOWTOAST, result));
// Show the return of the API calling
            }

        });
    }
现在,我们可以编译并运行工程,检查我们开始录像,停止录像功能了。如果一切正常,你将看到类似如下的截屏,
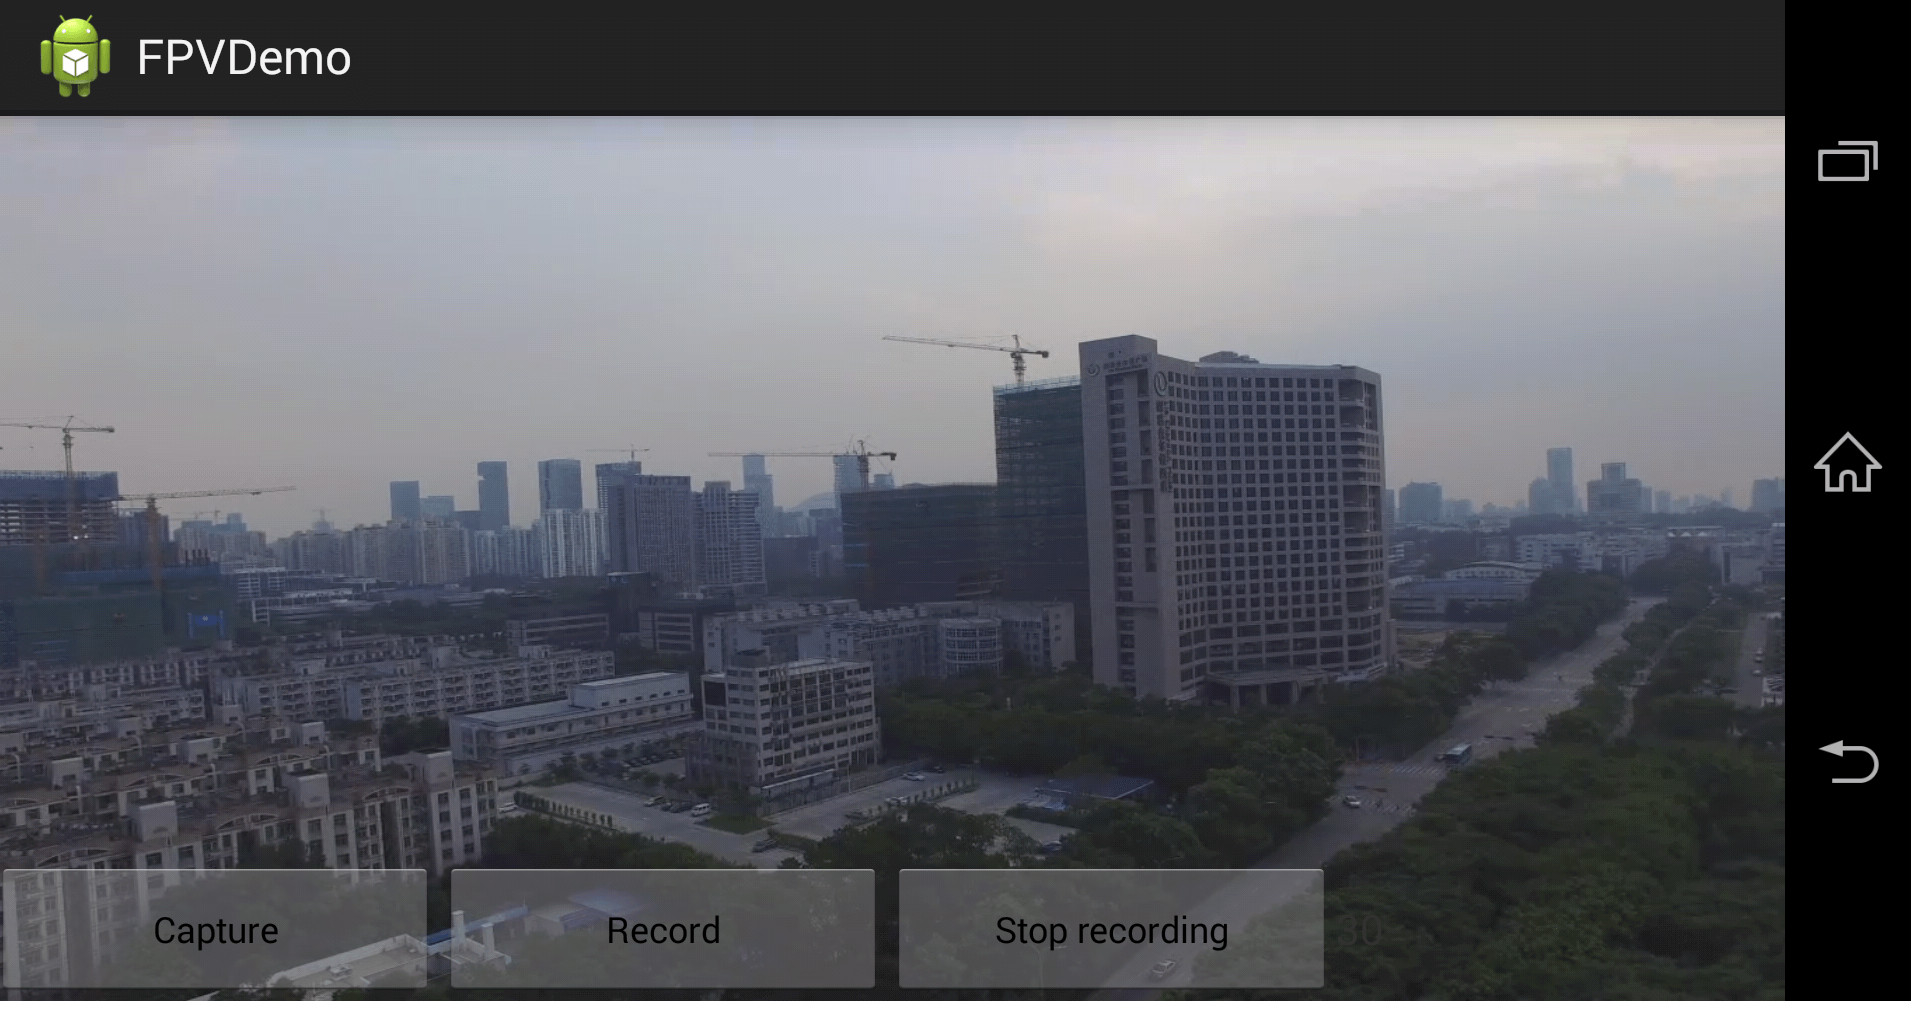
恭喜你!你的FPV航拍App已经大功告成,你现在可以用它来控制Inspire 1的相机了。
总结
你已经完成了整篇教程的学习: 你已经学会了如何配置DJI Mobile SDK的Android开发环境,并成功用它开发app来展示飞行器相机的FPV画面。同时,你也学会如何使用DJI Mobile SDK来开发app,展示飞行器相机的FPV视图,控制DJI 飞行器的相机进行拍照和录像操作,这两项功能经常被使用到,也是一款航拍app的基本功能点。但是,要开发一款很酷的航拍app,你还有很长的一段路要走。像预览SD卡中的照片和视频,展示飞机的OSD数据等等。请继续关注我们后续的教程,希望你喜欢!