Note:This Tutorial and Sample Project is developed based on DJI Android SDK v2.4, an update version for Android SDK v3.1.1 will be published soon.
Creating a Photo and Video Playback Application
- Introduction
- Camera Modes
- Distinguishing the Camera's Playback Status
- UI Components For The Photo Album Application
- Downloading and Deleting Media files
- Summary
If you come across any mistakes or bugs in this tutorial, please let us know using a Github issue, a post on the DJI forum, or commenting in the Gitbook. Please feel free to send us Github pull request and help us fix any issues. However, all pull requests related to document must follow the document style
Note: This tutorial is only for Phantom 3 Professional and Inspire 1
Introduction
In this tutorial, you will familiarize yourself with the various Camera Modes the Inspire 1 and Phantom 3 Professional have, how to switch and get the Camera Mode, how to build a friendly UI for a Photo and Video Album app, and how to select and download media files. Let's get started!
You can download the demo project for this tutorial from here: https://github.com/DJI-Mobile-SDK/Android-PlaybackDemo
We strongly recommend that you have the source code for the demo project open while working your way through this tutorial.
Camera Modes
Before developing the album app, we should briefly cover the capabilities the SDK has in each camera mode. For the Inspire 1 and Phantom 3 Professional, there are four camera modes, Capture Mode, Record Mode, Playback Mode and Download Mode. In Capture Mode, users are allowed to use capture functions, such as taking photos and setting up parameters for the camera. In the Record Mode, these capture functions are blocked and users can only start and stop recording video. Playback Mode allows the user to preview the media files in the SD card. Download Mode lets the user download media files, but must be set up correctly beforehand.
However, the Phantom 3 Advanced is different in that it has only three camera modes: Capture Mode, Record Mode and Download Mode. This will be discussed in a later tutorial.
In Mobile Android SDK, developers can invoke the method setCameraMode to switch between camera modes, and the method getCameraMode to get the camera mode. (Please note that the Phantom 2 Series is unique in that it only has two modes: CameraMode.Camera_Camera_Mode and Camera.Camera_USB_Mode, which are not supported by other more recent drones.)
    //Set up the Camera Mode.
    DJIDrone.getDjiCamera().setCameraMode(CameraMode, DJIExecuteResultCallback)

    //Get the Camera Mode
    DJIDrone.getDjiCamera().getCameraMode(DJICameraModeCallBack)
Distinguishing the Camera's Playback Status
As the introduced above, there are four or three camera modes (depending on the drone you are using). How to correctly recognize the mode you are in is key to developing a good Photo Album application. In the mobile android SDK, there is a callback function that returns current status of the camera's playback status. Developers can set up a callback function that executes when the status has been changed. This callback will be invoked 10 times per second.
    DJIDrone.getDjiCamera().setDJICameraPlayBackStateCallBack(new DJICameraPlayBackStateCallBack() {
        @Override
        public void onResult(DJICameraPlaybackState state) {
            ....

            Some statements..

            ....
        }
    });
Whenever the SDK receives the playback status information, it will package the information and create a DJICameraPlaybackState object to transfer the information from the SDK to the app. In order to further understand the status notifications, we've briefly explained DJICameraPlaybackState's attributes in the table below.
| Attribute | Description |
| currentSelectedFileIndex | The index of the currently selected file. Can be used to identify which media file is currently being previewed by the user. |
| fileDeleteStatus | Reflects the status of a media file being deleted. There are three possible statuses:
|
| isAllFilesInPageSelected | Returns whether all the media files in the current page have been selected. |
| isFileDownloaded | Notifies users, while the camera is in single preview mode, if the media file they are previewing has already been downloaded. Prevents files from being unintentionally being repeatedly downloaded. |
| isSelectedFileValid | Downloading 4K video or DNG images is not allowed. This attribute returns whether a selected file is valid to download. |
| mediaFileType | Reflects the file type of the currently previewed media file. There are three types of media files:
|
| numbersOfMediaFiles | The number of the media files on the SDcard. Useful for displaying the album's basic information. |
| numbersOfPhotos | The number of the image files on the SDcard (DNG and JPEG files). |
| numbersOfSelected | The number of currently selected files. Can be used to show and confirm the number of files the user wants to delete or download. |
| numbersOfThumbnail | The number of the thumbnails that can be downloaded from the SDcard. |
| numbersOfVideos | Similar to numberOfPhotos, reflects the number of the video files. |
| photoCenterCoordinateX | The x-coordinate of the center of the photo. |
| photoCenterCoordinateY | The y-coordinate of the center of the photo. |
| photoHeight | The height of the photo. |
| photoWidth | The width of the photo. |
| playbackMode | An enum for identifying the current playback mode. There are 7 possible values:
|
| videoDuration | This attribute is related only to video previews. Shows the length of the video. |
| videoPlayPosition | The current position of the video. |
| videoPlayProgress | This attribute can be used to update the video progress bar. |
As you can see, there are a lot of attributes in this class. Some of them contain basic information about media files and others provide important information for developers to identify what camera mode is being used and how the application should act accordingly. For example, developers can us the information from DJICameraPlaybackState to choose with UI elements to display.
Now that you are familiar with the playback information provided by the SDK we can begin to build our album application.
UI Components For The Photo Album Application
1. GridView for Multiple preview playback mode
In our official drone companion app, DJI Pilot, you can see that there are eight thumbnails in the app view while the camera is in the multiple playback mode (if you don't yet have DJI Pilot installed on your Android device click here to install it now). To achieve a comfortable user experience, we will provide a similar UI component for developers to include in their apps. The first thing we will implement is the Gridview (for further information on GridView from the official Android tutorial click here).
Below is a rough outline for the multiple preview UI. Each of these eight picture previews is a button. We implement these buttons through GridView.

There are two features of the grid view we should be aware of before we start:
- The grid view is scrollable.
- The object in each block can be designed by the user.
We override the base Gridview to satisfy our requirements (an unscrollable gridview with 8 transparent buttons). The following code block shows how we override GridView. Since it's quite basic, feel free to add more features in your own future apps.
    public class PlaybackGridView extends GridView {
        public PlaybackGridView(Context context) {
            super(context);
        }

        public PlaybackGridView(Context context, AttributeSet attrs) {
            supper(context, attrs);
        }

        public PlaybackGridView(Context context, AttributeSet attrs, int defStyle) {
            super(context, attrs, defStyle);
        }

        @Override
        public boolean dispatchTouchEvent(MotionEvent ev) {
            if (ev.getAction() == MotionEvent.ACTION_MOVE) {
                return true;
            }
            return super.dispatchTouchEvent(ev);
        }
    }
The method dispatchTouchEvent(MotionEvent ev) sets up the unscrollable property of the gridview. To use this to override GridView, developers should use the full path as the item tag. Take our file activity_playback_protocol.xml from our demo project as example:
    <?xml version="1.0" encoding="utf-8"?>
    <RelativeLayout xmlns:android="http://schemas.android.com/apk/res/android"
        android:layout_width="match_parent"
        android:layout_height="match_parent"
        android:orientation="vertical">
            <com.dji.download.demo.PlaybackGridView
                android:id="@+id/GridView"
                android:layout_width="fill_parent"
                android:layout_height="fill_parent"
                android:layout_marginTop="57dp"
                android:layout_marginLeft="6dp"
                android:layout_marginRight="6dp"
                android:marginBottom="57dp"
                android:numberColumns="4"
                android:android:verticalSpacing="8dp"
                android:horizontalSpacing="8dp"
                android:stretchMode="columnWidth"
                android:gravity="center"/>
    </RelativeLayout>
Now we have a basic gridview for the album application. The next file, 'button_gridview_item.xml' defines each element of the gridview and provides the block layout.
    <?xml version="1.0" encoding="utf-8"?>
    <LinearLayout xmlns:android="http://schemas.android.com/apk/res/android"
        android:layout_width="match_parent"
        android:layout_height="match_parent"
        android:orientation="vertical"
        >

        <Button
            android:id="@+id/TransparencyButton"
            android:layout_width="fill_parent"
            android:layout_height="110dp"
            android:background="@android:color/yellow"
            android:focusable="false"
            android:focusableInTouchMode="false"
            />
    </LinearLayout>
Congratulations! You have now collected all the components required to build a multiple playback preview album. The upcoming code will help you to combine them into a good looking UI.
    public class PlaybackProtocolActivity extends Activity implements OnClickListener {
        private PlaybackGridView mGridView;

        @Override
        protected void onCreate(Bundle savedInstanceState) {
            super.onCreate(savedInstanceState);
            setContentView(R.layout.activity_playback_protocol);

            onInitActivity();
        }

        private void onInitActivity() {
            mGridView = (PlaybackGridView)findViewById(R.id.GridView);

            ButtonAdapter adapter = new ButtonAdapter(this);
            mGridView.setAdapter(adapter);
        }

        @Override
        protected void onPause() {
            //Pause the AOA service
            ServiceManager.getInstance().pauseService(true);
        }

        @Override
        protected void onResume() {
            //Resume the AOA service
            ServiceManager.getInstance().pauseService(false);
        }

        @Override
        public void onClick(View v)    {
            ....

            Some statements

            ....
        }

        class ButtonAdapter extends BaseAdapter {
            private LayoutInflater inflater;

            public ButtonAdapter (Context mContext) {
                super();
                inflater = LayoutInflater.from(mContext);
            }

            @Override
            public int getCount()
            {
                return 8;
            }

            @Override
            public Object getItem(int position)
            {
                return position;
            }

            @Override
            public long getItemId(int position)
            {
                return position;
            }

            @Override
            public View getView(int position, View convertView, ViewGroup parent)
            {
                Button mBtn;
                final int p = position;
                if (null == convertView) {
                    convertView = inflater.inflate(R.layout.button_gridview_item, null);
                    mBtn = (Button)convertView.findViewById(R.id.TransparencyButton);
                    convertView.setTag(mBtn);
                } else {
                    mBtn = (Button)convertView.getTag();
                }
                return convertView;
            }

        }
    }
We've just finished the framework of our application! Now set PlaybackProtocolActivity as the main activity in your AndroidManifest.xml file. Run your project to enjoy the fruits of your labor!
2. Camera mode UI
Before we get started with this subsection, we've got to first make some adjustments:
- Follow the Creating a Camera Application to set up Android Open Accessory (AOA) support
- Change your main activity from
PlaybackProtocolActivitytoDJIAoaActivity - Add a DjiGLSurfaceView element to show the first personal view (steps 2 and 3 are also covered in the "Creating a Camera Application" tutorial)
- Add item feature
android:visibility="Gone"to our gridview inactivity_playback_protocol.xml - Adjust the button color by replacing
android:background="@android:color/yellow"withandroid:background="@android:color/transparent"inbutton_gridview_item.xml.
Now we can continue. As we know from section 1, there are four camera modes and each of them allows or prevents certain functions to be invoked. To increase clarity for users, developers should adjust the UI components based on the current camera status. Let's add some buttons in activity_playback_protocol.xml.
    <RelativeLayout xmlns:android="http://schemas.android.com/apk/res/android"
        android:layout_width="match_parent"
        android:layout_height="martch_parent"
        android:orientation="vertical">
            <com.dji.download.demo.PlaybackGridView
                android:id="@+id/GridView"
                .../>

            <RelativeLayout
                android:layout_width="fill_parent"
                android:layout_height="40dp"
                android:layout_alignParentBottom="true">

                <Button
                    android:id="@+id/CaptureBtnPlayback"
                    android:layout_width="wrap_content"
                    android:layout_height="wrap_content"
                    android:layout_alignParentLeft="true"
                    android:text="@string/playback_protocol_capture_button_string"
                    android:textSize="14sp"
                    android:visibility="gone"
                    />

                <Button
                    android:id="@+id/StartRecordBtnPlayback"
                    android:layout_width="wrap_content"
                    android:layout_height="wrap_content"
                    android:layout_toRightOf="@id/CaptureBtnPlayback"
                    android:text="@string/playback_protocol_strat_record_button_string"
                    android:textSize="14sp"
                    android:visibility="gone"
                    />

                <Button
                    android:id="@+id/StopRecordBtnPlayback"
                    android:layout_width="wrap_content"
                    android:layout_height="wrap_content"
                    android:layout_toRightOf="@id/StartRecordBtnPlayback"
                    android:text="@string/playback_protocol_strat_record_button_string"
                    android:textSize="14sp"
                    android:visibility="gone"
                    />

                <Button
                    android:id="@+id/MultiplePreviewBtnPlayback"
                    android:layout_width="wrap_content"
                    android:layout_height="wrap_content"
                    android:layout_toRightOf="@id/StopRecordBtnPlayback"
                    android:text="@string/playback_protocol_multiple_preview_mode_button_string"
                    android:textSize="14sp"
                    android:visibility="gone"
                    />

                <Button
                    android:id="@+id/MultiSelectPreviewBtnPlayback"
                    android:layout_width="wrap_content"
                    android:layout_height="wrap_content"
                    android:layout_toRightOf="@id/MultiplePreviewBtnPlayback"
                    android:text="@string/playback_protocol_edition_mode_button_string"
                    android:visibility="gone"
                    android:textSize="14sp"
                    />

                <Button
                    android:id="@+id/DownloadBtnPlayback"
                    android:layout_width="wrap_content"
                    android:layout_height="wrap_content"
                    android:layout_toRightOf="@id/MultiSelectPreviewBtnPlayback"
                    android:visibility="gone"
                    android:text="@string/playback_protocol_download_button_string"
                    android:textSize="14sp"
                    />

                <Button
                    android:id="@+id/DeleteBtnPlayback"
                    android:layout_width="wrap_content"
                    android:layout_height="wrap_content"
                    android:layout_toRightOf="@id/DownloadBtnPlayback"
                    android:visibility="gone"
                    android:text="@string/playback_protocol_delete_button_string"
                    android:textSize="14sp"
                    />

                <Button
                    android:id="@+id/PlaybackModeBtnPlayback"
                    android:layout_width="wrap_content"
                    android:layout_height="wrap_content"
                    android:layout_alignParentRight="true"
                    android:text="@string/playback_protocol_playback_mode_button_string"
                    android:textSize="14sp"
                    />

                <Button
                    android:id="@+id/RecordModeBtnPlayback"
                    android:layout_width="wrap_content"
                    android:layout_height="wrap_content"
                    android:layout_toLeftOf="@id/PlaybackModeBtnPlayback"
                    android:text="@string/playback_protocol_record_mode_button_string"
                    android:textSize="14sp"
                    />

                <Button
                    android:id="@+id/CaptureModeBtnPlayback"
                    android:layout_width="wrap_content"
                    android:layout_height="wrap_content"
                    android:layout_toLeftOf="@id/RecordModeBtnPlayback"
                    android:text="@string/playback_protocol_capture_mode_button_string"
                    android:textSize="14sp"
                    />
            </RelativeLayout>
    </RelativeLayout>
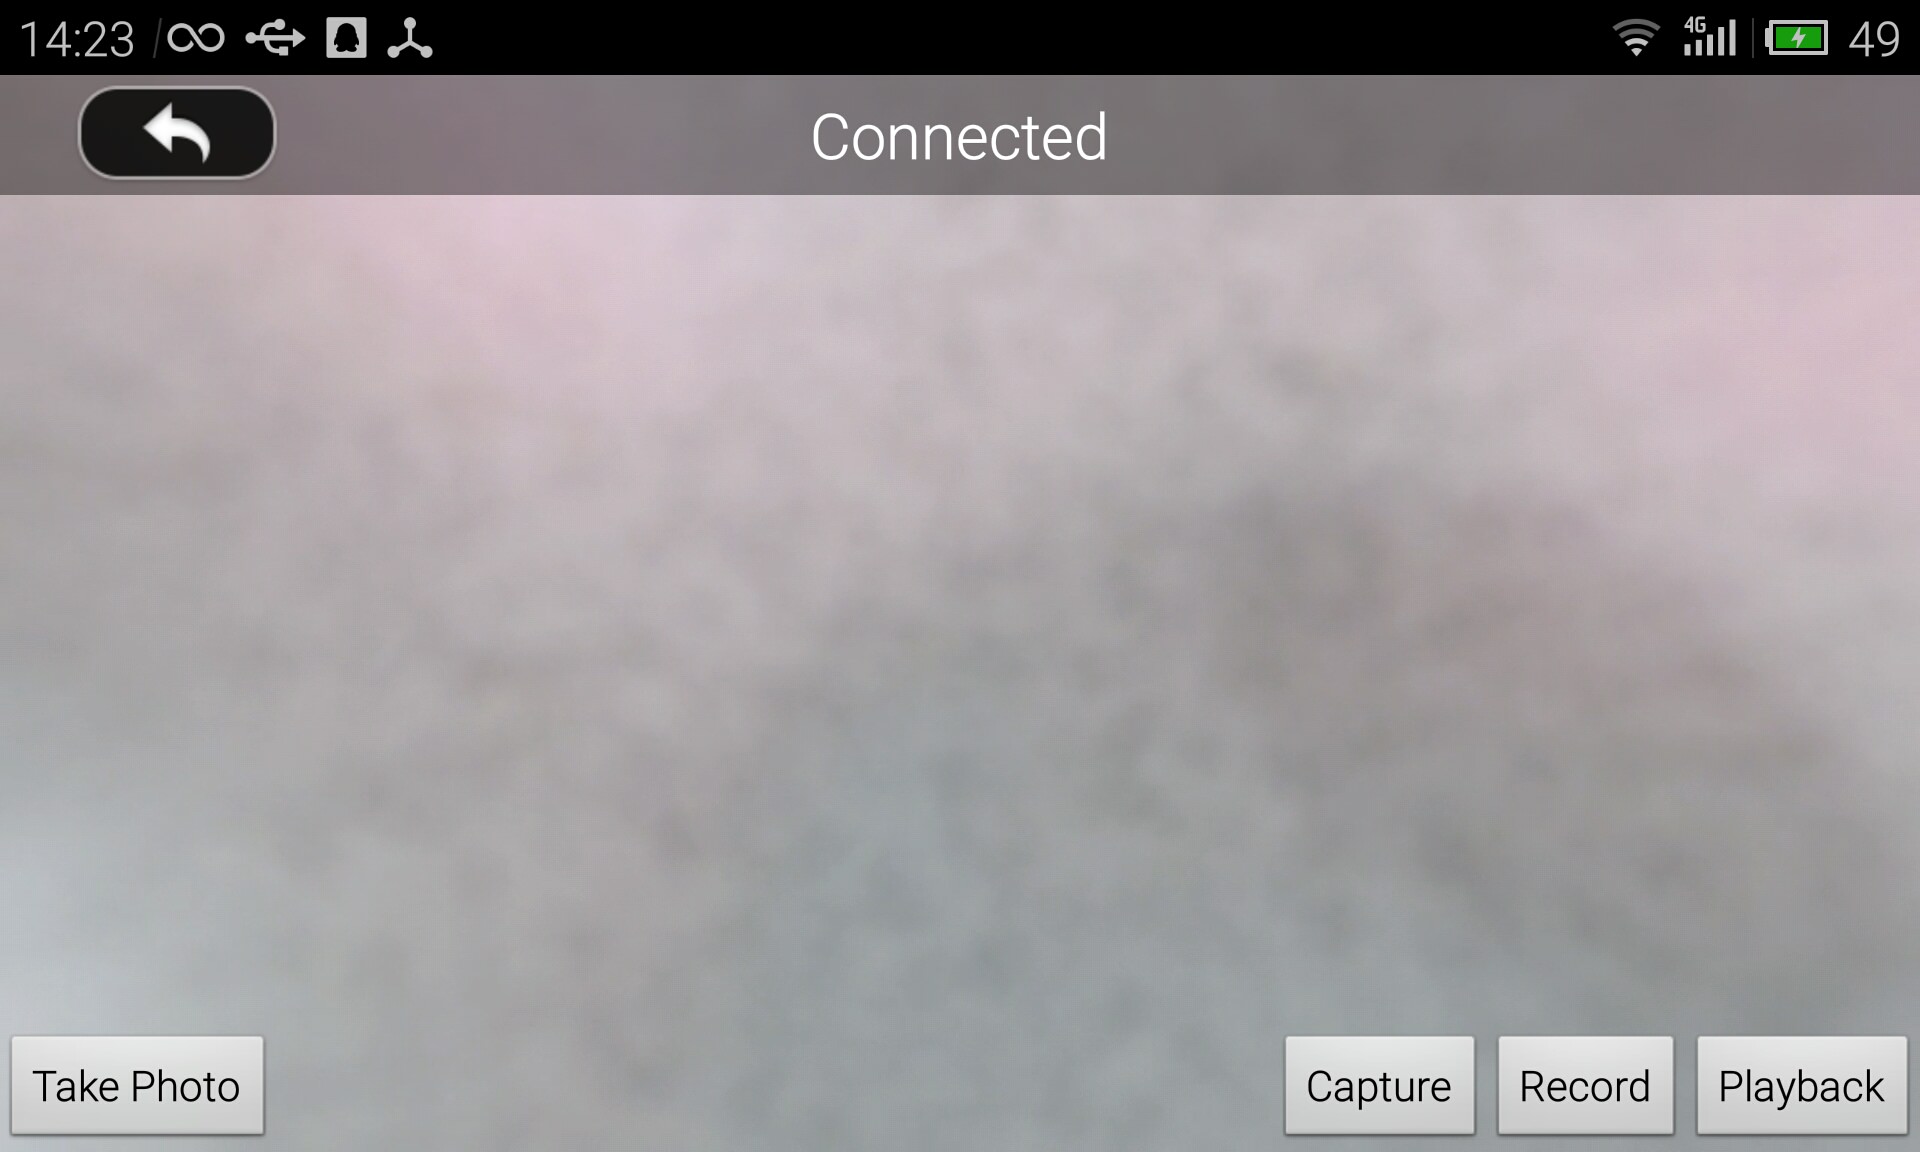
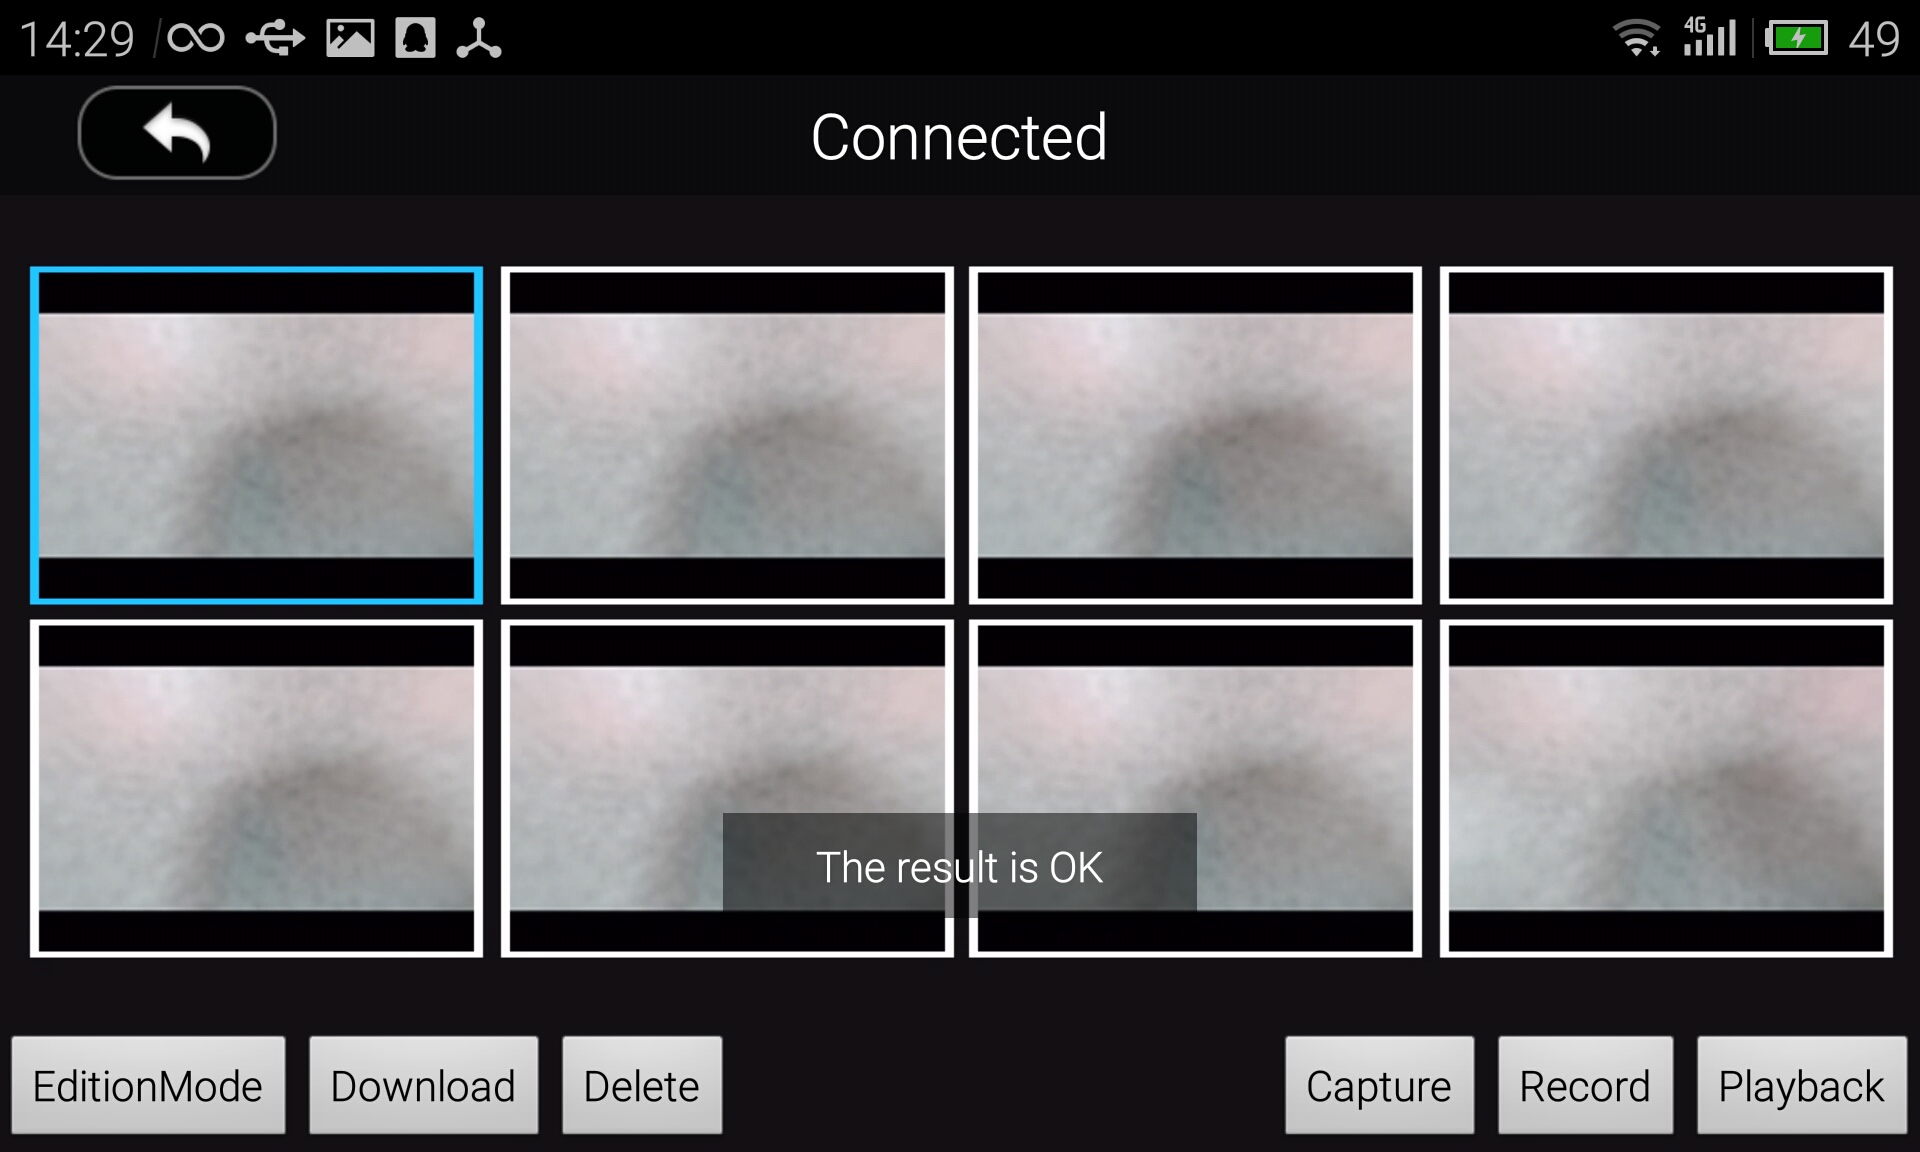
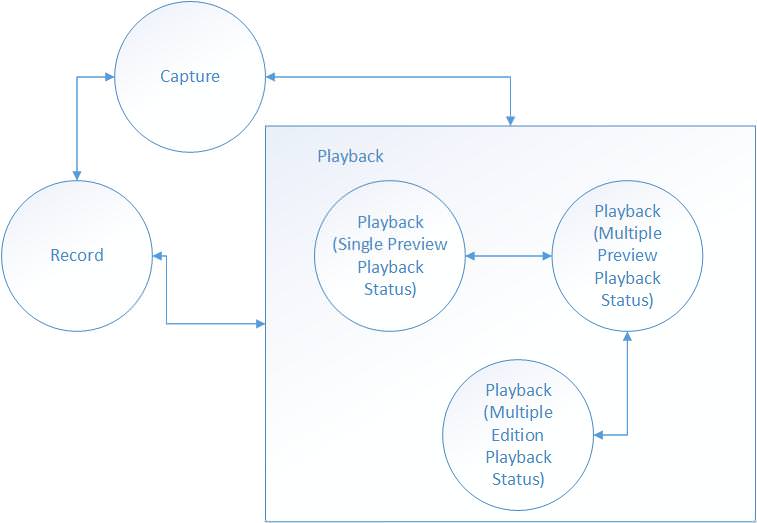
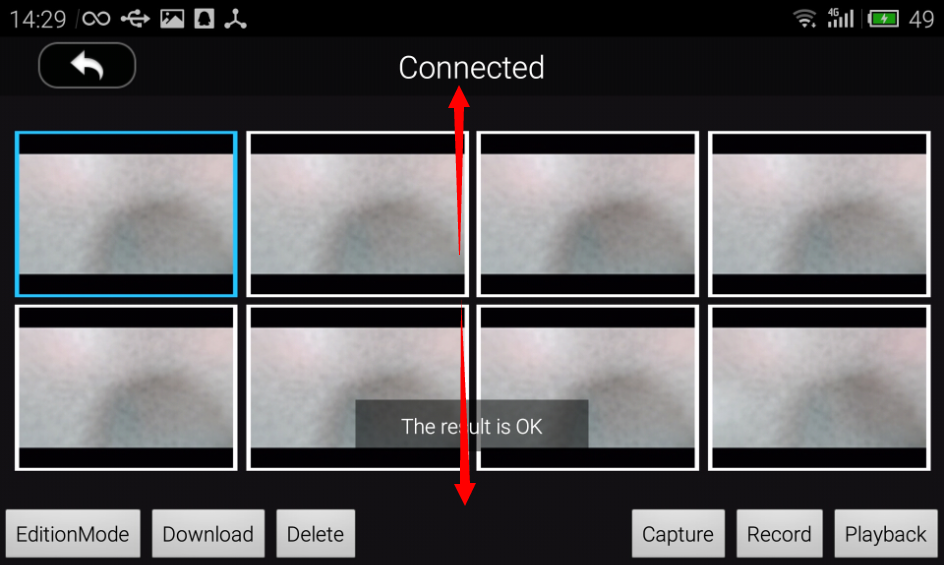
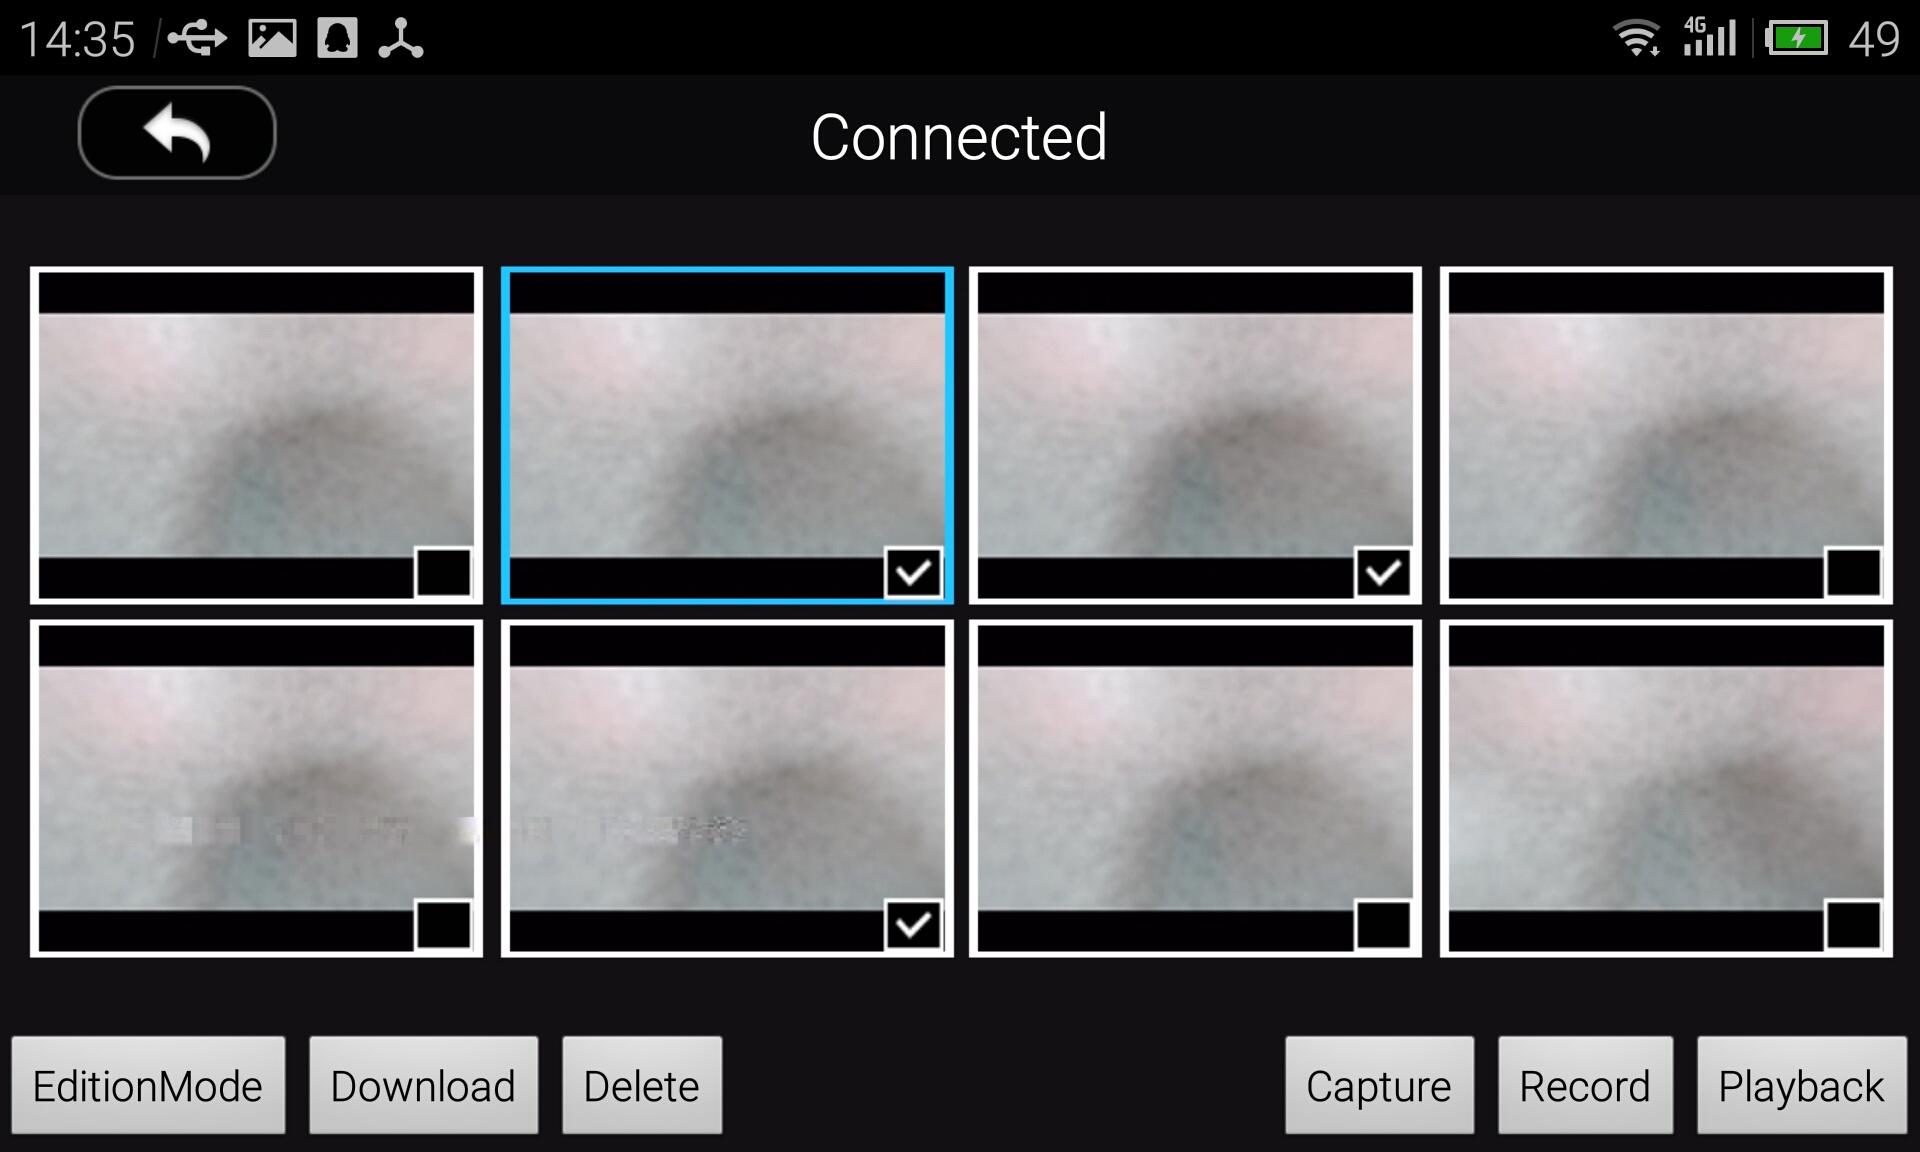
The Capture, Record and Playback buttons, which allow the user to navigate between these three modes, will always be present. Within the Playback mode, however, there are three submodes Single Preview, Multiple Preview and Multiple Edition. Entering Playback mode places the user in Single Preview mode. In Multiple Preview mode, users can press any image to enter Single Preview mode. Multiple Edition playback mode is different from Multiple Preview in that it allows users to select, download and delete files. Take a look below for screenshots outlining which specific buttons and features should be included in each mode, as well as a state switch diagram outlining the relationship between modes:


Now the gridview onItemClick logic needs to be adjusted based on the current playback status using the following code:
    private void onStatusChange(final int status) {
        PlaybackProtocolActivity.this.runOnUiThread(new Runnable() {
            public void run() {
                switch (status) {
                    case CAPTURE : {
                        mStartTakePhotoBtn.setVisibility(VISIBLE);
                        mStartRecordBtn.setVisibility(GONE);
                        mStopRecordBtn.setVisibility(GONE);
                        mMultiplePreviewModeBtn.setVisibility(GONE);
                        mMultiSelectPreviewModeBtn.setVisibility(GONE);
                        mDownloadBtn.setVisibility(GONE);
                        mDeleteBtn.setVisibility(GONE);
                        mGridView.setVisibility(GONE);
                        mPlayVideoBtn.setVisibility(GONE);
                        mPauseVideoBtn.setVisibility(GONE);
                        break;
                    }

                    case RECORD : {
                        mStartTakePhotoBtn.setVisibility(GONE);
                        mStartRecordBtn.setVisibility(VISIBLE);
                        mStopRecordBtn.setVisibility(VISIBLE);
                        mMultiplePreviewModeBtn.setVisibility(GONE);
                        mMultiSelectPreviewModeBtn.setVisibility(GONE);
                        mDownloadBtn.setVisibility(GONE);
                        mDeleteBtn.setVisibility(GONE);
                        mGridView.setVisibility(GONE);
                        mPlayVideoBtn.setVisibility(GONE);
                        mPauseVideoBtn.setVisibility(GONE);
                        break;
                    }

                    case PLAYBACK : {
                        mStartTakePhotoBtn.setVisibility(GONE);
                        mStartRecordBtn.setVisibility(GONE);
                        mStopRecordBtn.setVisibility(GONE);
                        mMultiplePreviewModeBtn.setVisibility(VISIBLE);
                        mMultiSelectPreviewModeBtn.setVisibility(GONE);
                        mDownloadBtn.setVisibility(VISIBLE);
                        mDeleteBtn.setVisibility(VISIBLE);
                        mGridView.setVisibility(GONE);
                        break;
                    }

                    case MULTIPLEPLAYBACK : {
                        mStartTakePhotoBtn.setVisibility(GONE);
                        mStartRecordBtn.setVisibility(GONE);
                        mStopRecordBtn.setVisibility(GONE);
                        mMultiplePreviewModeBtn.setVisibility(GONE);
                        mMultiSelectPreviewModeBtn.setVisibility(VISIBLE);
                        mDownloadBtn.setVisibility(VISIBLE);
                        mDeleteBtn.setVisibility(VISIBLE);
                        mGridView.setVisibility(VISIBLE);
                        break;
                    }
                }
            }
        });
    }
This method classifies the UI status into four parts (capture, record, playback and multipleplayback). When camera mode changes, this routine will adjust the visibility of the individual UI components.
Besides adjusting the UI, we should also send a request from our app to the drone to change the camera mode. Remember the method setCameraMode(CameraMode mode) in Section 1? Now we put it to use:
    private void onPressStatusBtn(final int status) {
        DJIDrone.getDjiCamera().setCameraMode(CameraMode.find(status), new DJIExecuteResultCallback() {
            @Override
            public void onResult(DJIError mErr) {
                if (DJIError.RESULT_OK == mErr.errorCode) {
                    onStatusChange(status);
                }
            }
        });
    }
The parameter status tells this method which mode to switch the camera to. We use the following constants as input parameters.
    private final static int CAPTURE = 2;
    private final static int RECORD = 3;
    private final static int PLAYBACK = 4;
    private final static int MULTIPLEPLAYBACK = 5;
The constants start from '2' because the value of Camera_Capture_Mode in the enum CameraMode is 2. We edit our onClick() function so that onPressStatusBtn(final int status) is invoked when the appropriate buttons are pressed, and adjust which constant we pass in depending on which button is pressed:
    public void onClick(View v) {
        switch(v.getId()) {
            ....

            case R.id.CaptureModeBtnPlayback : {
                onPressStatusBtn(CAPTURE);
                break;
            }

            case R.id.RecordModeBtnPlayback : {
                onPressStatusBtn(RECORD);
                break;
            }

            case R.id.PlaybackModeBtnPlayback : {
                onPressStatusBtn(PLAYBACK);
                break;
            }

            case R.id.MultiplePreviewBtnPlayback : {
                DJIDrone.getDjiCamera().enterMultiplePreviewMode(mExecuteCallback);
                onStatusChange(MULTIPLEPLAYBACK);
                break;
            }

            ....
        }
    }
To keep the UI logic consistent, we also detect the current status of the camera in the onCreate() function. In our demo, we do this after checkPermission(Context, DJIGeneralListener) gets the SDK level.
     new Thread(){
            public void run() {
                try {
                    DJIDrone.checkPermission(getApplicationContext(), new DJIGerneralListener() {

                        @Override
                        public void onGetPermissionResult(int result) {
                            // TODO Auto-generated method stub
                            Log.e(TAG, "onGetPermissionResult = "+result);
                            Log.e(TAG, "onGetPermissionResultDescription = "+DJIError.getCheckPermissionErrorDescription(result));
                            if (result == 0) {
                                //This method require sdk level higher than level-1. Also permission should be got befor invoking this method.
                                DJIDrone.getDjiCamera().getCameraMode(new DJICameraModeCallBack() {
                                    public void onResult(CameraMode mode) {
                                        onStatusChange(mode.value());
                                        if (mode._equals(CameraMode.Camera_PlayBack_Mode.value())) {
                                            DJIDrone.getDjiCamera().setCameraMode(CameraMode.Camera_PlayBack_Mode, mExecuteCallback);
                                        }
                                    }
                                });
                            } else {
                                Log.e(TAG,"Result error.");
                            }
                        }
                    });
                } catch (Exception e) {
                    // TODO Auto-generated catch block
                    e.printStackTrace();
                }
            }
        }.start();
The Inspire 1's and Phantom 3 Professional's remote controllers have buttons for capturing, recording and entering the playback mode. Once these buttons have been pressed, the camera status will be changed directly. Would be great if our application could listen to the buttons at the remote controller and automatically adjust the UI?
To listen to the remote controller, we set up DJIRemoteControllerUpdateAttitudeCallBack. Add the code below to the onCreate() function, but make sure to declare the variable mRemoteControllerUpdateAttitudeCallBack first.
            mRemoteControllerUpdateAttitudeCallBack = new DJIRemoteControllerUpdateAttitudeCallBack() {

            @Override
            public void onResult(DJIRemoteControllerAttitude attitude)
            {
                if (attitude.playbackStatus || attitude.recordStatus || attitude.shutterStatus) {
                    DJIDrone.getDjiCamera().getCameraMode(new DJICameraModeCallBack() {

                        @Override
                        public void onResult(CameraMode mode)
                        {
                            onStatusChange(mode.value());
                        }

                    });
                }
            }

        };

        DJIDrone.getDjiRemoteController().setRemoteControllerUpdateAttitudeCallBack(mRemoteControllerUpdateAttitudeCallBack);
attitude.playbackStatus, attitude.recordStatus and attitude.shutterStatus reflect the status of the corresponding buttons on the remote controller. Once the user clicks the corresponding button on the remote controller, these attributes will become true.
You have finished implementing the adaptive UI. Build and run your app, and enjoy!
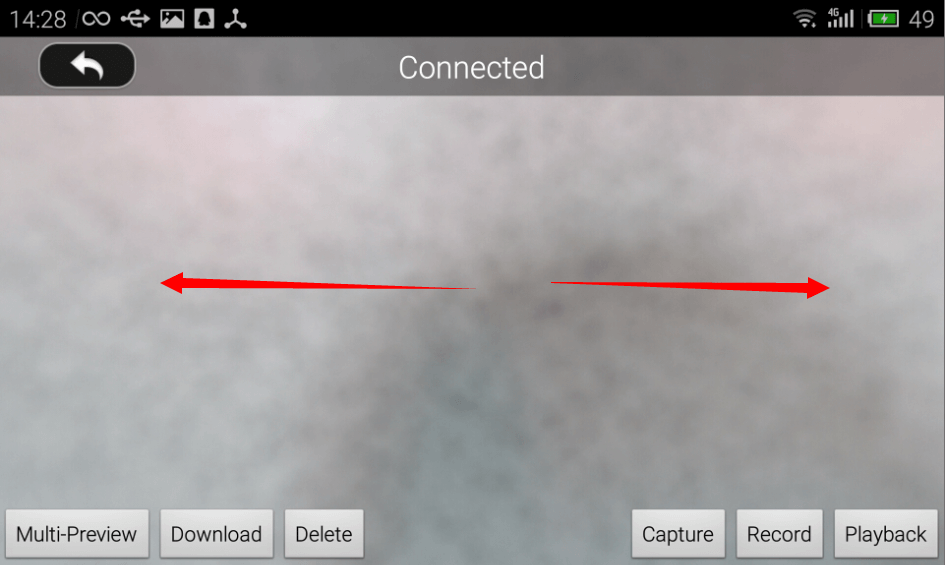
3. Album gesture control
For a better user experience, we will be adding gestures to our application. In Multiple Preview mode, if the user swipes up or down, the view will display the previous or next page of images. In Single Preview mode, if the user swipes left or right, the view will display the previous or next media file. We use GestureDetector to implement this function.
For a further understanding of the GestureDetector class, follow this link: http://developer.android.com/reference/android/view/GestureDetector.html
    private GestureDector mGestureDector;

    mGestureDetector = new GestureDetector(this, new GestureDetector.SimpleOnGestureListener(){
           @Override
           public boolean onFling(MotionEvent e1, MotionEvent e2, float velocityX, float velocityY) {
               if (e2.getRawX() - e1.getRawX() > GESTURETHRESHOLD) {
                   DJIDrone.getDjiCamera().singlePreviewNextPage(mExecuteCallback);
                   return true;
               }

               if (e1.getRawX() - e2.getRawX() > GESTURETHRESHOLD) {
                   DJIDrone.getDjiCamera().singlePreviewPreviousPage(mExecuteCallback);
                   return true;
               }

               if (e1.getRawY() - e2.getRawY() > GESTURETHRESHOLD) {
                   DJIDrone.getDjiCamera().multiplePreviewPreviousPage(mExecuteCallback);
                   return true;
               }

               if (e2.getRawY() - e1.getRawY() > GESTURETHRESHOLD) {
                   DJIDrone.getDjiCamera().multiplePreviewNextPage(mExecuteCallback);
                   return true;
               }
               return false;
           }
    });
If you run your application and try to test this method, you may find that nothing happens. The reason for this is that both the gridview and the gesture detectors will try to handle the user's actions. Both of them try to handle an action at the same time, causing failures. To avoid this situation, we need to override the function dispatchTouchEvent
    @Override
    public boolean dispatchTouchEvent(MotionEvent event) {
        if (mGestureDetector.onTouchEvent(event))
            return false;
        super.dispatchTouchEvent(event);
        return true;
    }
Nice! Some predefined gestures have been added to your app and have made your app more user friendly.
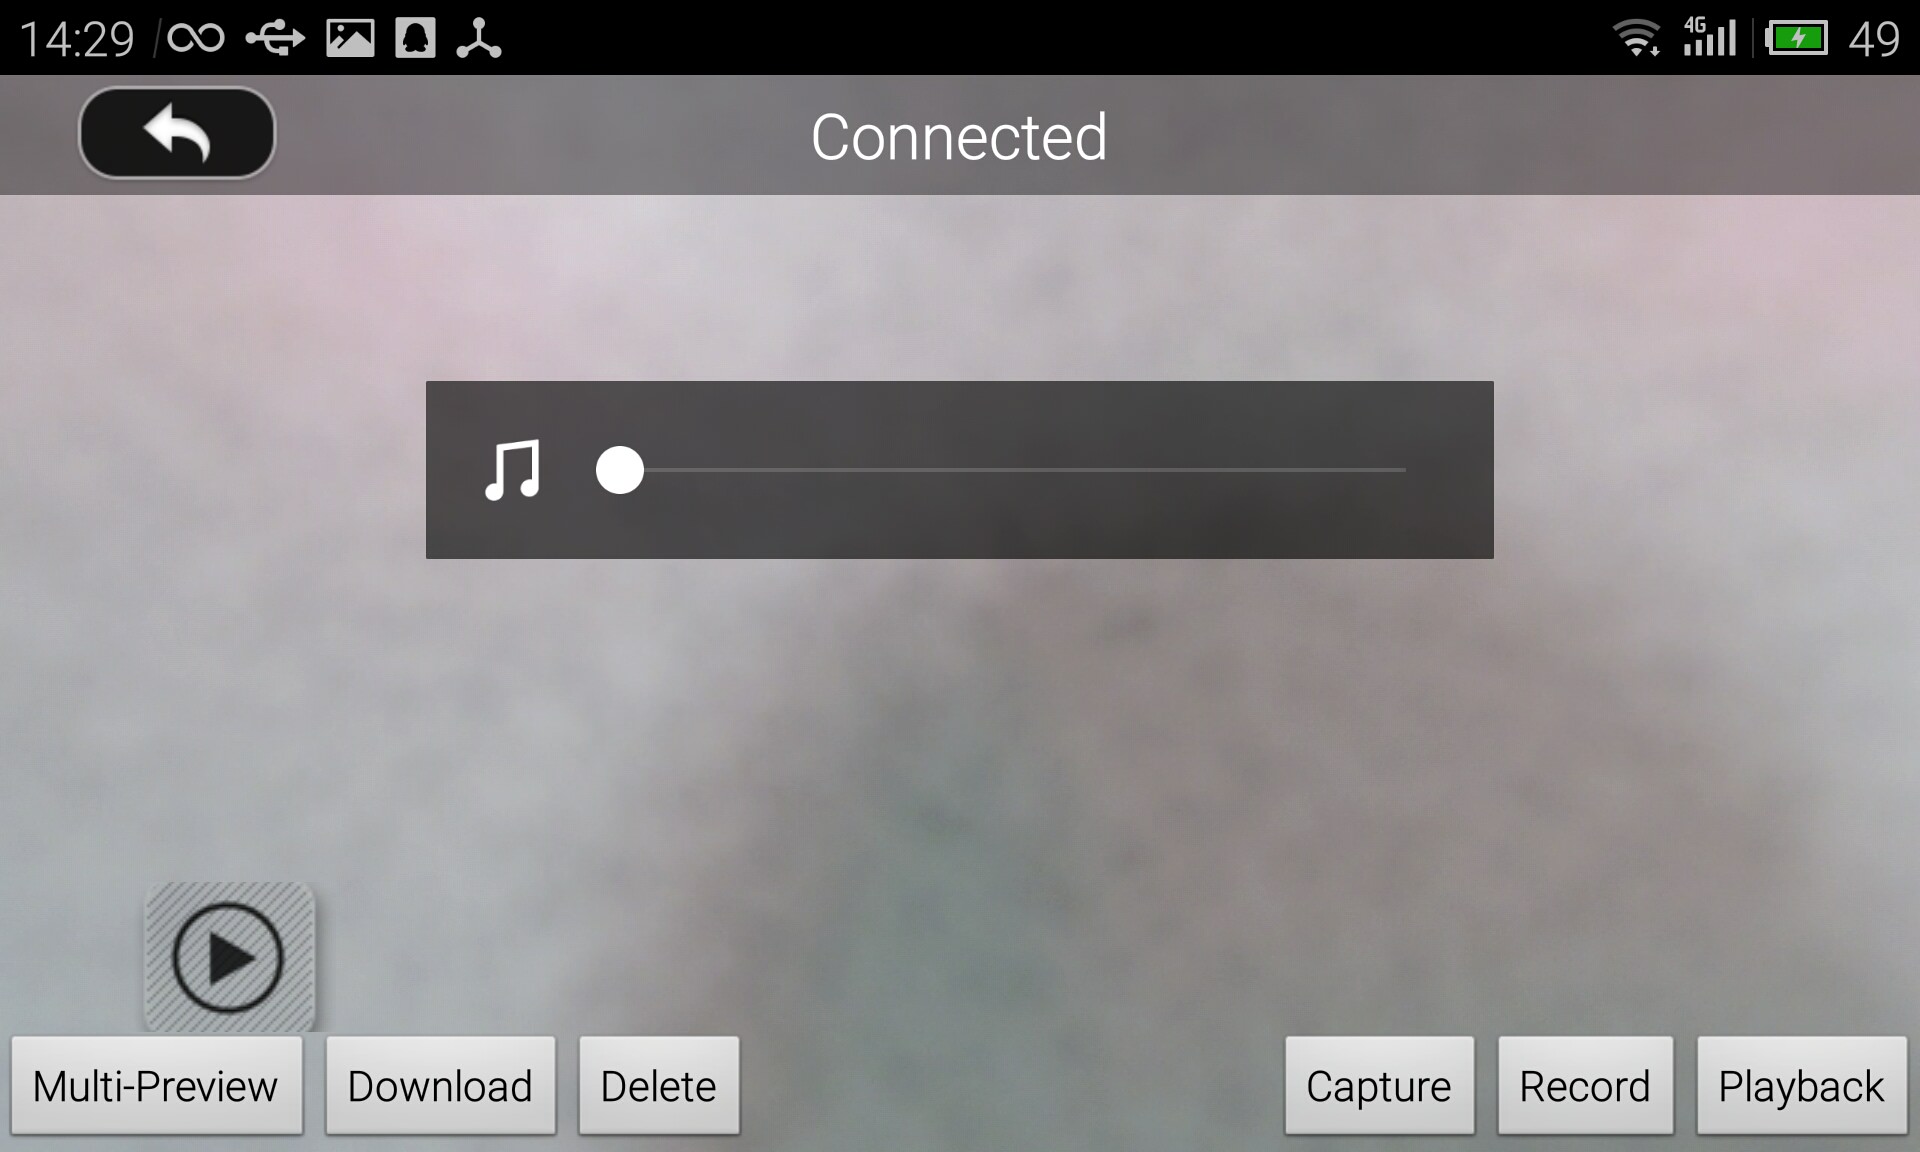
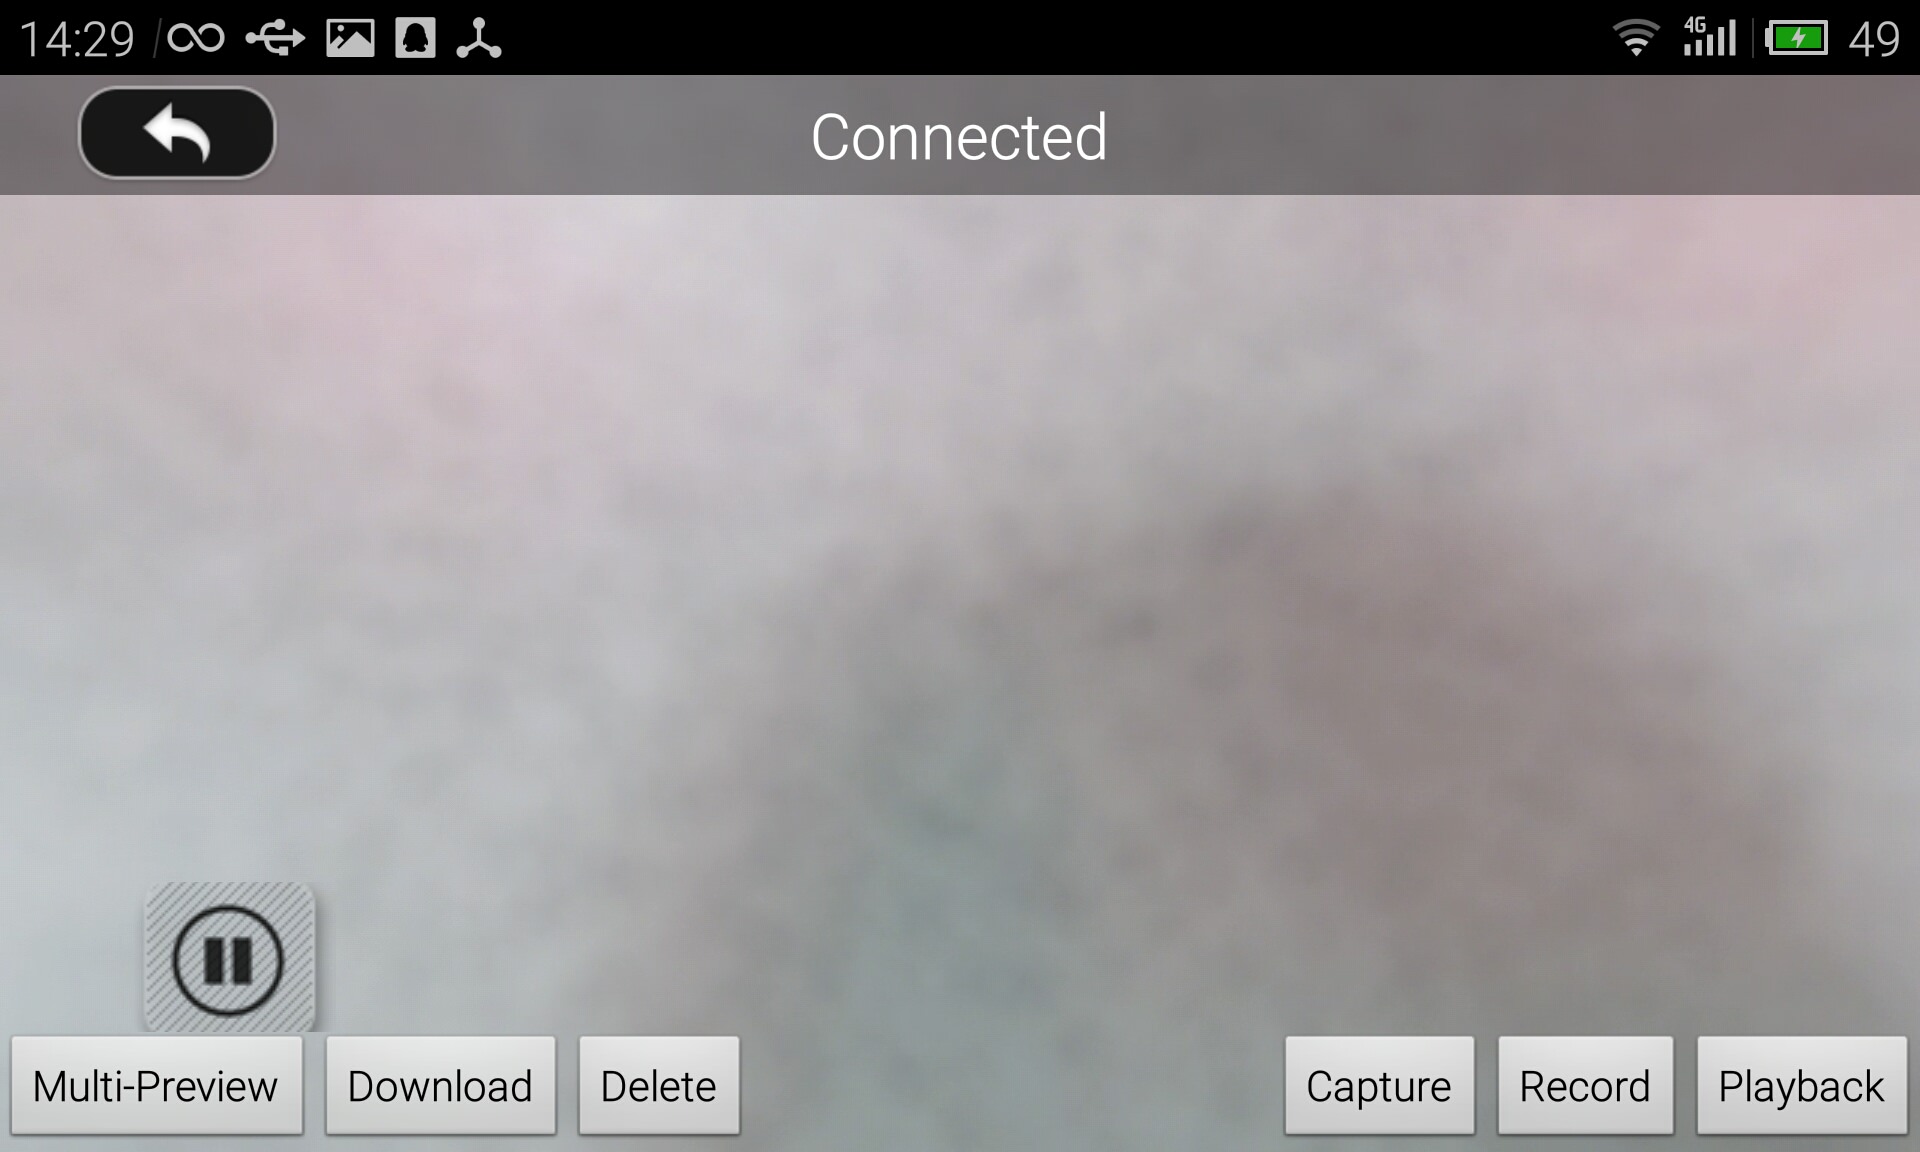
4. Playing Video
DJI Camera provides a video preview function for users to enjoy their recorded videos. In the current state of our app, users can enter the single preview playback mode and navigate to their video file by swiping left and right. We would also like for them to be able to click a play or pause button to control video playback when previewing a video file. To implement this, first add two buttons to your activity.xml file.
     <RelativeLayout
        android:layout_width="fill_parent"
        android:layout_height="50dp"
        android:layout_alignParentBottom="true"
        android:layout_marginBottom="40dp"
        >"

        <ImageButton
            android:id="@+id/PlayVideoBtnPlayback"
            android:layout_height="wrap_content"
            android:layout_width="wrap_content"
            android:layout_alignParentLeft="true"
            android:layout_marginLeft="40dp"
            android:src="@drawable/play_video"
            android:visibility="gone"
            android:background="@android:color/transparent"
            />

        <ImageButton
            android:id="@+id/PauseVideoBtnPlayback"
            android:layout_height="wrap_content"
            android:layout_width="wrap_content"
            android:layout_alignParentLeft="true"
            android:layout_marginLeft="40dp"
            android:src="@drawable/pause_video"
            android:visibility="gone"
            android:background="@android:color/transparent"
        />
    </RelativeLayout>
The image resources for these buttons need to be copied into the drawable-mdpi folder, and two elements need to be added into the .xml file drawable.
    <item android:drawable="drawable/play_video" android:state_pressed="false"></item>
    <item android:drawable="drawable/pause_video" adnroid:state_pressed="false"></item>
However, there are two types of media files the user can preview while in single preview playback mode, image files and video files. If the play button or the pause button were to appear while the user were previewing a picture, it would be unnecessary and annoying. To combat this we set up a listener in onCreate() to detect which type of file the user is currently previewing.
      mCameraPlaybackStateCallBack = new DJICameraPlayBackStateCallBack(){

            @Override
            public void onResult(DJICameraPlaybackState state)
            {
                mCameraPlaybackState = state;
                    PlaybackProtocolActivity.this.runOnUiThread(new Runnable() {

                        @Override
                        public void run()
                        {
                            // TODO Auto-generated method stub
                            isVideoPreview();
                        }

                    });
            }

        };
isVideoPreview() is used to adjust the UI features.
    private void isVideoPreview() {
        if (mCameraPlaybackState.mediaFileType.value() == CameraMediaFileType.Media_File_VIDEO.value()) {
            if (mCameraPlaybackState.videoPlayProgress == 0) {
                mPlayVideoBtn.setVisibility(VISIBLE);
                mPauseVideoBtn.setVisibility(GONE);
            } else {
                mPlayVideoBtn.setVisibility(GONE);
                mPauseVideoBtn.setVisibility(VISIBLE);
            }
        } else {
            mPlayVideoBtn.setVisibility(GONE);
            mPauseVideoBtn.setVisibility(GONE);
        }
    }
Now the app will automatically detect whether the camera is in video single preview playback mode, and remove the play and pause buttons if not.
You have successfuly implemented all the UI features that this tutorial has to offer! Give your app another go.
Downloading and Deleting Media files
1. Finishing the Download feature
In previous sections, we discussed and implemented three out of four camera modes. In this section we will cover the final camera mode, Download Mode.
Please note that DNG images and 4k video cannot be downloaded through playback mode. In addition, the two methods below are not supported by the Inspire 1 or Phantom 3 Professional:
fetchMediaData(DJIMedia, DJIExecuteResultCallback)fetchMediaThumbnail(DJIMedia, DJIExecuteResultCallback)
As we've already implemented all the necessary UI features, the only thing we have left to do is add some logic to our existing buttons. Add the following code into onClick(View v):
    @Override
    public void onClick(View v) {
    ....

        case R.id.MultiSelectPreviewBtnPlayback : {
            if (!isEdited) {
                DJIDrone.getDjiCamera().enterMultipleEditMode(mExecuteCallback);
                isEdited = true;
            } else {
                DJIDrone.getDjiCamera().exitMultipleEditMode(mExecuteCallback);
                isEdited = false;
            }
            break;
        }

        case R.id.DeleteBtnPlayback : {
            if (mCameraPlaybackState.playbackMode._equals(CameraPlaybackMode.Multiple_Media_Files_Display.value())) {
                DJIDrone.getDjiCamera().deleteAllSelectedFiles(mExecuteCallback);
                isEdited = false;
            } else {
                DJIDrone.getDjiCamera().deleteCurrentPreviewFile(mExecuteCallback);
            }
            break;
        }

        case R.id.DownloadBtnPlayback : {
            File destDir = new File(Environment.getExternalStorageDirectory().getPath() + "/Dji_Sdk_Test/");
            if (!destDir.exists()) {
                destDir.mkdirs();
            }
            if (!mCameraPlaybackState.playbackMode._equals(CameraPlaybackMode.Multiple_Media_Files_Display.value()))
                DJIDrone.getDjiCamera().downloadCurrentPreviewFile(destDir, mFileDownloadCallBack);
            else
                DJIDrone.getDjiCamera().downloadAllSelectedFiles(destDir, mFileDownloadCallBack);
            break;
        }

    ....
    }
We create a DJIFileDownloadCallBack object to be added in the onCreate() function, as shown below. DJIFileDownloadCallBack includes a handler. You can find the handler declaration in our demo code.
    mFileDownloadCallBack = new DJIFileDownloadCallBack() {

            @Override
            public void OnStart()
            {
                handler.sendMessage(handler.obtainMessage(SHOWDOWNLOADDIALOG, null));

                if(mProgressDialog != null){
                    mProgressDialog.setProgress(0);
                }

                handler.sendMessage(handler.obtainMessage(SHOWTOAST, "download OnStart"));
                DJILogHelper.getInstance().LOGD("", "download OnStart",true,false);
            }

            @Override
            public void OnError(Exception exception)
            {
                // TODO Auto-generated method stub
                handler.sendMessage(handler.obtainMessage(CLOSEDOWNLOADDIALOG, null));
                handler.sendMessage(handler.obtainMessage(SHOWTOAST, "download OnError :"+exception.toString()));
                DJILogHelper.getInstance().LOGD("", "download OnError :"+exception.toString(),true,false);
            }

            @Override
            public void OnEnd()
            {
                // TODO Auto-generated method stub

                handler.sendMessage(handler.obtainMessage(CLOSEDOWNLOADDIALOG, null));
                handler.sendMessage(handler.obtainMessage(SHOWTOAST, "download OnEnd" + mCameraPlaybackState.numbersOfSelected));

                DJILogHelper.getInstance().LOGD("", "download OnEnd",true,false);

                DJIDrone.getDjiCamera().finishDownloadAllSelectedFiles(new DJIExecuteResultCallback() {

                    @Override
                    public void onResult(DJIError mErr)
                    {
                        // TODO Auto-generated method stub
                        DJILogHelper.getInstance().LOGD("", "download finishDownloadAllSelectedFiles:"+mErr.errorDescription,true,false);
                    }
                });

                isEdited = false;
            }

            @Override
            public void OnProgressUpdate(int progress)
            {
                // TODO Auto-generated method stub
                if(mProgressDialog != null){
                    mProgressDialog.setProgress(progress);
                }

                DJILogHelper.getInstance().LOGD("", "download OnProgressUpdate progress="+progress,true,false);
            }

        };
For multiple preview downloads, developers should first invoke enterMultipleEditMode(DJIExecuteResultCallback) to enter the multiple edition playback mode so that the users can select the media files they want to delete or download. To support selecting media files and entering single preview playback status, the following code should be added in the getView(int position, View convertView, ViewGroup parent) function of ButtonAdapter.
    mBtn.setOnClickListener(new OnClickListener() {

        @Override
        public void onClick(View v)
        {
            if (!isEdited) {
                DJIDrone.getDjiCamera().enterSinglePreviewModeWithIndex(p, new DJIExecuteResultCallback() {

                    @Override
                    public void onResult(DJIError mErr)
                    {
                        // TODO Auto-generated method stub
                        if (mErr.errorCode == DJIError.RESULT_OK) {
                            onStatusChange(PLAYBACK);
                        }
                    }
                });
                isMultiple = false;

            } else {
                DJIDrone.getDjiCamera().selectFileAtIndex(p, mExecuteCallback);
            }
        }

    });
Now try selecting some media files and downloading them!

2. Automatically downloading media files
Some developers might want to download the media files from their drone automatically. This subsection will introduce exactly how to do this. First of all, developers should understand that all the methods involved with downloading are asynchronous, which means some routines should wait for the ack from the drone to continue its execution.
Here's the code to implement automatic downloading, the developer could use handler to execute the ENTERPLAYBACK function, then the process will be executed automatically:
    private Handler handler = new Handler(new Handler.Callback() {

        @Override
        public boolean handleMessage(Message msg)
        {
            switch (msg.what) {
                case STARTAUTODOWNLOAD : {
                    DJIDrone.getDjiCamera().setCameraMode(CameraMode.Camera_PlayBack_Mode, new DJIExecuteResultCallback() {

                        @Override
                        public void onResult(DJIError mErr)
                        {
                            // TODO Auto-generated method stub
                            if(mErr.errorCode == DJIError.RESULT_OK) {
                                handler.sendEmptyMessageDelayed(ENTERMULTIPLEPLAYBACK, 2000);
                            }
                        }
                    });
                    break;
                }
                case ENTERMULTIPLEPLAYBACK : {
                    DJIDrone.getDjiCamera().enterMultiplePreviewMode(new DJIExecuteResultCallback() {

                        @Override
                        public void onResult(DJIError mErr)
                        {
                            // TODO Auto-generated method stub
                            if (mErr.errorCode == DJIError.RESULT_OK) {
                                handler.sendEmptyMessageDelayed(ENTERMULTIPLEEDIT, 2000);
                            }
                        }
                    });
                    break;
                }

                case ENTERMULTIPLEEDIT : {
                    DJIDrone.getDjiCamera().enterMultipleEditMode(new DJIExecuteResultCallback() {

                        @Override
                        public void onResult(DJIError mErr)
                        {
                            // TODO Auto-generated method stub
                            if (mErr.errorCode == DJIError.RESULT_OK) {
                                handler.sendEmptyMessageDelayed(SELECTFIRSTFILE, 2000);
                            }
                        }
                    });
                    break;
                }

                case SELECTFIRSTFILE : {
                    // There are a lot of selection methods in our SDK, developers could use them to handle which one they want to download.
                    DJIDrone.getDjiCamera().selectFileAtIndex(0, new DJIExecuteResultCallback() {

                        @Override
                        public void onResult(DJIError mErr)
                        {
                            // TODO Auto-generated method stub
                            if (mErr.errorCode == DJIError.RESULT_OK) {
                                handler.sendEmptyMessageDelayed(DOWNLOADIT, 2000);
                            }
                        }
                    });
                    break;
                }

                case DOWNLOADIT : {
                    File destDir = new File(Environment.getExternalStorageDirectory().getPath() + "/Dji_Sdk_Test/");
                    if (!destDir.exists()) {
                        destDir.mkdirs();
                    }
                    /** The implementation of mFileDownloadCallBack could be found in the previous tutorial. **/
                    DJIDrone.getDjiCamera().downloadAllSelectedFiles(destDir, mFileDownloadCallBack);
                    break;
                }
            }
            return false;
        }
    });
You can invoke handler.sendEmptyMessage(STARTAUTODOWNLOAD) to automatically download the media files.
In summary, developers should follow the following steps to allow users to download multiple files:
setCameraModeto switch the camera status into the playback mode.enterMultiplePreviewModeto prepare for downloading multiple media files.enterMultipleEditModeto enter the multiple edition playback status so that the users can browse through images they may want to download.Once the
enterMultipleEditModesucceeds and return an ack, use theselectFileAtIndex,selectAllFilesandselectAllFilesInPagefunctions to select files based on user input.Once the selection methods succeed and return an ack, invoke
downloadAllSelectedFiles.The app has successfully downloaded the files.
finishDownloadAllSelectedFilesshould be invoked while the ack comes to ensure camera returns to playback mode.
Summary
Over the course of this tutorial, you have learned how to switch and get the current camera mode, download and delete media files, implement gesture control, and much more to create a Photo and Video Album application for the Inspire 1 and Phantom 3 Professional!
In the next tutorial, we will be implementing the album app for Phantom 3 Advanced.